Pages

Saturday, 31 October 2015

Happy Halloween Friends


Happy Halloween to all my blog friends and followers, today for my DT post at Cheery Lynn Designs  I have made a Halloween card which I would like to share with you all.


For my Halloween card I cut out my stacker layers in Black and Mauve cardstock. I cut my Mauve layer in half so I could slightly offset it for a shadow effect, I also love how it has given a Gothic look to the die cut.


My Twiggy wreath and wording were also shadowed for extra detail and to make my design 'pop'.


I added some glittered gems and my Jack O Lantern to finish.

Hope you have a lovely weekend. 

Julie x

Shop at Cheery Lynn For:


Friday, 30 October 2015

Tag Friday - A Vintage Journey


Hi Everyone, it's "Tag Friday" over at  A Vintage Journey and today I am sharing with you my DT tag. Before we get started I would like to thank everyone who left me a comment last week on my Destination Inspiration post over at AVJ, I loved reading them all. 


I started off by stamping on to Ideaology Mask Sheets with Stazon ink and cutting out my images and placing on my tag with the sticky surfaces down.


Adding some more stamping with Archival ink on Speciality Stamping Paper.


Then adding some Crackle Paste.


Inking with Distress inks and Spritz and Flick technique and then I replaced my stencil over the top to add more Distress ink on to my Crackle Paste.


My Flower I coloured with Distress ink and a water brush. I Added more Ink and a little Gilding Wax to finish, along with a hand dyed ribbon using Distress Stains.

Thanks for stopping by today and please head over to A Vintage Journey, as my fabulous Teamies are also sharing their Tags.

Julie x

Wednesday, 28 October 2015

Christmas Gift Set


Hi Everyone, Today I'm sharing some more of Craft Consortium's new Decoupage Papers for my DT post. I remember as my girls were growing up I loved when they would come home with something they had handcrafted at School or a Youth Club. I still have several items in my Memory Box and Christmas Decoration Box which are precious memories of them growing up. This is what inspired me today to make my own Christmas Bauble and gift box using Craft Consortium's new range of Decoupage Papers and their Gypsy Gypsy pad.


I started by giving my Paper Mâché Bauble a coat of Gesso and then added torn pieces of Decoupage Paper to it with Mod Podge.


My Poinsettia Flowers were cut out in vellum , a little Gilding wax added to the edges and Flower Soft in the centres.


My box I made using papers from the Gypsy Gypsy pad and my Scorpal board. I added my bow and tag which had been die cut out in Mirri card.


I assembled my gift into the box using one of the lush metallic Decoupage papers from the range as packaging for a luxurious feel.

Please head over to Craft Consortium on Facebook and like their page. You will then get info of competitions and Giveaways.

Thanks for stopping by today.

Julie x

Craft Consortium Products Used :

Cheery Lynn Dies -

Sunday, 25 October 2015

La Parfumerie


Hi Everyone, it's the turn of the mixed media design team to host the challenge at That Craft Place which is Anything Goes Mixed Media.

For this challenge I have decorated one of the small shrine boxes available at That Craft Place. Lisa has a few style of these delightful boxes so please check out the links on my sidebar should you wish to purchase one.

The little house approximately measures 2.5 inches across x 4 inches high with a depth of an inch. They come flat packed and are very easy to build.


I decided I wanted to turn mine in to a Parfumerie House. I built up the shrine and added a layer of Gesso and then some Texture paste over a Stencil. I added sections of Chipboard so I could add a roof on to my shrine.


Next I painted my house and stamped some text on to it, which only stamped on to my raised areas. Finishing the outside with some Gilding Wax.


On the inside I added a floor using coffee stirrer sticks.


Next using an old book page I added small pieces of Craft Consortium's decoupage paper, finishing with a layer of Crackle Glaze. I then placed this in my house as the wallpaper for my background.


My roof was cut out of Craft Consortium's Gypsy Gypsy Paper pad using my Cheery Lynn Cuties 3 strip, off-setting each layer to give a tiled effect.


My Perfume bottles were stamped and fussy cut out, adding a layer of Glossy Accents.


3D Perfume bottles are made from small beads from my stash.


My small mannequin button I painted, adding on various beads, lace and metal embellishments to my mannequin and house to finish. I added the little base to my house and sat it on to some old beads as small feet.

Thanks for stopping by today and please pop over to our team blog and see what my fabulous Teamies have made for this challenge.

Julie x

Products Used:
That Craft Place - MDF Shrine Box
Cheery Lynn B151 Cuties 3 Strip
Craft Consortium Gypsy Gypsy Pad & Decoupage Papers DecoArt Products


All available to purchase at That Craft Place.

Saturday, 24 October 2015

Life's A Beach


Hi everyone and welcome to my new followers, today for my DT card I'm showcasing some more of the wonderful New Release dies at Cheery Lynn Designs with this beach scene card which could easily adapt for Memory Books and Scrapbook Pages.


I die cut my Life's a Beach in brown cardstock - notice the fabulous texture of it looking like an old washed up log on a beach, so cool. I mounted on to a piece of white cardstock which I had inked with shades to compliment my card. I then went around the outline of the letters with a Glaze pen to make them 'pop' and added a little twine.


My waves were layered twice adding some shells and a little starfish which I coloured with a Copic Pen. 


My Reeds and Cat Tails were cut out in coloured cardstock adding in some dried grass from my stash.

Thanks for stopping by today and for all your wonderful comments on my Perfume bottles, they made my day.

Julie x


Shop at Cheery Lynn For :
New Release Die -
Other Cheery Lynn Dies Used:

Wednesday, 21 October 2015

Up-Cycled Perfume Bottles - Craft Consortium


Hi Everyone, I'm so excited to be sharing with you my inspiration using Decoupage Papers released this week from Craft Consortium. They have an amazing new range which also includes Metallics and Christmas Collections. Please check them out HERE.


I had a couple of empty glass bottles sitting in my stash for a while waiting to be up-cycled and when I received this release I thought they would blend beautifully together as Faux Perfume Bottles. I started off by giving them both a coat of Gesso.


Once dry I started to apply my Decoupage Paper.


Followed by a thick coat of Crackle Glaze.


Next I highlighted my cracks using DecoArt Mixed Media Antiquing Cream in Titanium White. I repeated the process on both bottles, finishing off with a coat of Gloss Varnish.


On this bottle my frame is made from a mould and Paperclay, adding a little paint and Gilding Wax. I placed a little lace inside the frame along with my Cameo.


My Flowers are made using papers from the Bloom Beautiful Pad.


Finishing off my bottle with a little lace around the neck of the bottle and some Pearls. My Perfume stoppers were up-cycled from a window charm.


On this bottle I stamped my Perfume sign with Stazon ink onto paper from the Gypsy Gypsy pad. My flowers were made from White cardstock shaded with inks. My doily and flourish and fussy cut Butterfly were all also cut from papers out of the Gypsy Gypsy Pad. A few pearls to finish.

Do check out Craft Consortium Ltd on Facebook and like their page. This way you will be alerted for regular giveaways.

Thanks for stopping by today and I hope you have enjoyed my post.

Julie x

Products Used:
Craft Consortium Gypsy Gypsy Paper Pad, Bloom Beautiful Paper Pad and Decoupage Papers from latest Collections.
Cheery Lynn Dies.

Monday, 19 October 2015

A Vintage Journey -Sneaky Peek


Hi everyone, Just a sneaky peek, as today I'm over at A Vintage Journey hosting our Monday Destination Inspiration post. Would love for you to pop over to see my tutorial.


Julie x

Saturday, 17 October 2015

Je t'aime Paris


Hi Everyone, Have you seen the Cheery Lynn Designs - New Release of dies ? Today I am sharing with you my vintage styled Parisian card as my DT post at Cheery Lynn.


As you can see on my rectangle layers I tattered and inked the edges, nesting the new Royal Scandinavian Doily in between my mats with Silicone Glue.


My Heart was cut out in cream cardstock and inked at the edges. I layered on to pink cardstock and fussy cut around it and glued in place with Silicone Glue then added my Paris word.


My Eiffel Tower was cut out in 2 shades for a shadow effect.


My Vintage Car was cut out in Cream cardstock twice, I then coloured small elements with a Gold pen and glued in place, finishing off with a little ink on the edges.

Thanks for stopping by today.

Julie x

Shop at Cheery Lynn for New Release Dies:


Other Cheery Lynn Dies Used:


Thursday, 15 October 2015

Aloha Hawaii - Cheery Lynn Designs October 2015 New Release


Hi fellow bloggers, today Cheery Lynn Designs launch their exciting new October release of dies which is an eclectic mix of Travel designs, words, memory books and lacey frames. Please check out what my fellow Teamies have been up to with the new dies HERE and you can view the full range HERE.


For my card I decided to use a bright floral paper and colours to compliment these fun travel dies. My Aloha Hawaii was layered 3 times for a 3D shadow effect layering my flower in the centre.


My palm tree was shaded with Copics, off-setting another layer of branches behind the top layer for a 3D look.


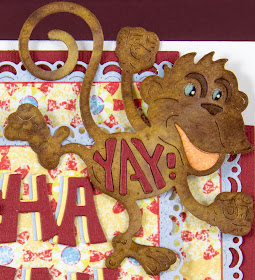
Before I die cut my Monkey I crumpled a square of Kraft cardstock, next I unraveled the Cardstock and added ink over it and sprayed with a little water, re crumpling and drying with my heat-gun. This gave my paper great texture to look like the Monkeys fur. I added in my letters and eyes which had been colours with Copics.

I will be back on Saturday showcasing some more of the new dies from this release.

Julie x

Shop at Cheery Lynn for :
New Release-

Previously released-

Saturday, 10 October 2015

Winter Wedding


Hi Everyone, winter is fast approaching now in Scotland and a lot of people like to have a Winter Wedding in hope of some snow. So I thought for my DT card at Cheery Lynn Designs it would be nice to share some inspiration for a Wedding card to give in the Winter with soft wintry shades.


Here is a photograph of my first few layers. I tore my paper and inked at the edges with Spun Sugar and cut my doilies in half, placing them behind the cardstock.


I now added my leaf flourish and also cut and pieced another leaf flourish on to my card.


My words were layered for a shadow effect and I added an extra layer on to my banner by fussy cutting and tattering the edges.


My flowers were made using the Sweet Christine die. I added a little gem in to the centres and also made some small buds using the same die to add some more interest on to my bouquet.

Thanks for stopping by today. 

Julie x

Shop at Cheery Lynn For :