Translator

Saturday, 28 May 2016

Vintage Kisses


Hi everyone, the challenge over at Cheery Lynn Designs at present is Lots of Layers and I thought it would be fun to join in with some inspiration for my DT card this week using the new Lords and Commons A2 die Facer set.
I decided to use my die set for an Easel styled card, using negative parts of the die and some of the corner shapes as well as the Facer.


You will see I tattered all my layers as I started to layer adding some stitching to the top layer, along with some Frantage and the little hearts that fall out of the negative space of the die, topping with a Pearl.


My flowers were inked in the centre along with some Flowersoft. My leaves I scattered some Frantage onto them.


I used the corner accent that comes in the Facer set and my Tiny Doily to add some more detail and layered behind my stacker frames at the image.


My flower to hold the Easel in place was mounted onto my Lords and Commons tiny Doily. 

Thanks so much for stopping by my blog today and I hope you have a lovely creative weekend. Look forward to seeing you in the Cheery Lynn Designs  Bi - Weekly Challenge.

Crafty Hugs,
 Julie x
Shop at Cheery Lynn For:

Saturday, 21 May 2016

Just for You


Hi everyone, thanks so much for all your wonderful comments during our blog hop at Cheery Lynn and here on my blog, I so enjoyed reading them. Unfortunately I am struggling to catch up with all your blogs as I am down with a flu virus just now, but hope to catch up soon.

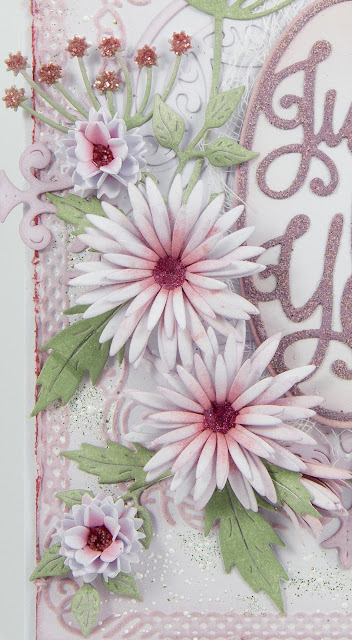
Today for my DT card at Cheery Lynn Designs I am showcasing the new - Just For You die.


I started by using White Cardstock along with my IOE plates and Embossing folder to make my background. I inked my card with Milled Lavender to highlight the embossed areas, tattered the edges of my card and added a sprinkle of Frantage for a shabby feel.


My Just For You was heat set with Milled Lavender Distress Powder and layered onto my Oval and mounted onto my Quadrafoil Doily with a little cheesecloth for extra detail.


My flowers and leaves are all cut out in White Cardstock. I shaded my Dandelions with Bundled Sage Distress ink at the stems and added Milled Lavender Distress Glitter onto the flowers. The centre of my Chrysanthemums is Micro Beads and a little Distress Glitter into the centre of my Sweet Christine flowers.

Thanks so much for stopping by today and good luck to everyone entering the Weekly Challenge at Cheery Lynn Designs.

Have a lovely weekend.

Happy Crafting,


Julie x
Shop at Cheery Lynn For:

I wish to enter this in to the following Challenges:


Tuesday, 17 May 2016

Vintage Songbirds


Hi everyone, thanks for stopping by today to see my DT post for Craft Consortium using their stunning Bloom Beautiful paper pad and White Wood Decoupage paper.

I was recently at a craft fair and loved all the inspirational projects Anna-Marie had made and decided to mix a little of her style with my own on this card.


I started by mounting my Decoupage Paper onto White Cardstock with Mod Podge. Once dry I tattered the edges and added some stitching with my sewing machine and lace. I stamped my sentiment onto the Decoupage Paper with Archival Ink.


My bird was fussy cut from the inside cover of the Bloom Beautiful paper pad. My flowers and leaves were all die cut from the same paper pad. I love the little accents of gold in my leaves from the paper. My large Daisy I added a Resin Rose to the centre, which had been highlighted with a little Gesso.


I used some foam tape between my layers arranging my die cuts into a floral arrangement adding some pearls and dried flowers to finish.

Crafty Hugs,
Julie x

Craft Consortium Products Used:


The flowers and leaves are all Cheery Lynn Dies.

Sunday, 15 May 2016

Cheery Lynn Designs May Release 2016 - Blog Hop


Hi Everyone, thanks for stopping by today. We are all so excited at Cheery Lynn Designs to be sharing with you our inspiration using the new May 2016 release. I am first up on the blog hop but if you get a little lost on route please just link back to Cheery Lynn Designs.


I was so excited to find out there was a few new birds in this latest release. If you follow me regularly you will know how much I adore Cheery Lynn's Bird dies and this Swan is an absolutely beautiful die to work with, filled with grace and elegance for any crafty project.


I die cut out my Swan 5 times in heavy cardstock and on 3 of the layers I cut off the head and neck part.


You will see on this photo I fluffed out the feathers to give a 3 D look and started to layer on 3 die cut body parts, finishing off with a complete Swan on my top section.


I shaded the Swans beak with Black and Orange Copics and a Fineliner pen to highlight the detail. Finishing off with a small drop of Black Liquid Pearls for the eye.


My background was shaded with Distress Inks, adding my Cattails and Reeds which were finished off with a little Flower Soft and Distress Glitter.
You will also notice a touch of Glossy Accents on my wave for a watery look. 


My Sun was made from the  Sunflower Die adding a stamped sentiment to the centre, finishing off with a few Dragonflies.

I'd love for you to leave me a comment so I know you have stopped by, I always love to read them.

Please carry on this hop where you will see more of the New Release dies showcased by my Teamies. Finishing back at Cheery Lynn Designs for a chance to win a $20 shopping Spree.

Your next stop on the Blog Hop is my talented Teammie LISA.

Crafty Hugs,
Julie xx 

Cheery Lynn Dies Used:


Saturday, 14 May 2016

Under the Sea


Hi Everyone, today for my DT card at Cheery Lynn Designs I am sharing with you an underwater themed card which would also look great on a scrapbook layout.


On the edge of my card I tattered my second layer with the edge of my scissors. Next I pressed the edge into my Versamark ink pad and heat set some Gold Embossing powder. My word Explore was also heat embossed in gold.


I used a mixture of foliage on the list below to give the look of Seaweed and Coral at the bottom of the sea. On my Princess Tree die I added a little Distress Stickles. My Starfish was shaded with ink and highlighted with a Fineliner pen, as was my Sand Dollar.


My Anchor was shaded with Copics, heat setting a little Distress Powder and a Patina powder for an aged rusty Look.


The detail on the Seahorse dies is incredible. I cut them out in patterned paper adding a little Stickles and Black Liquid Pearls to their eyes.I moulded the shape of them with my fingers for a curved look and mounted onto my card with Silicone Glue.


Finishing off with an accent from the Ships Compass


My wave edger, small shells and pearls.

We are having a blog hop tomorrow over at Cheery Lynn Designs to showcase a wonderful New Release from them, there are so many new dies on my wish list !
So please stop by and you could be in with the chance of winning a shopping spree.

Thanks so much for stopping by today. The Current Challenge  at Cheery Lynn is Red, White and Blue. I hope you get a chance to join in the fun to win a $20 shopping spree at Cheery Lynn.
  
Crafty Hugs,

 Julie

Shop at Cheery Lynn for:

Paper used on Seahorses is Craft Consortium's Bloom Beautiful paper pad.

Saturday, 7 May 2016

Songbirds


Hi Everyone, In Scotland the Songbirds are all starting to sing. It's so lovely to hear them happy now Spring has arrived.....unless it's 5 o'clock in the morning ! So my Cheery Lynn Designs DT card today was taken from inspiration of the blossom filled trees and these beautiful birds.

I started by layering up a couple of my stacker dies to form the frame of my card. I love how the inverted scallops give the appearance of a postage stamp edge.


My branches were all cut out in textured Green Cardstock and I went over the branch area with a Brown Copic Pen. I then shaded a small piece of White Cardstock with a few shades of ink and then die cut out my flowers and added a little Stickles into the centres.


My sentiment was stamped onto patterned paper.


My sweet little birds were shaded with Distress inks to look like a Robin and a Blue Tit. I added a drop of Liquid Pearls for their eyes and highlighted the details of the die with a Fine Liner pen. If you google an image of the kind of bird you want to colour on your die, I find this makes it easy to shade them.

The Current Challenge at Cheery Lynn Designs is Mothers Day and I do hope you get a chance to join in for a chance to win a $20 shopping spree.
Thanks so much for stopping by and for the wonderful comments you leave. I love reading them and appreciate them so much.

Crafty Hugs,

Friday, 6 May 2016

Sew Special - A Vintage Journey


Hi Everyone, thanks for stopping by. Today we start a new challenge at A Vintage Journey hosted by my super talented teamie Jenny. She has chosen the theme Sew Special.

I love this theme and was so pleased to be joining in. I always feel you can go to town with embellishments, die cuts and lace on a sewing project.


My edges of my card were all tattered for a shabby feel inserting small strips of lace and adding a distressed styled stitching.


My centre strip I added 2 layers of die cuts, some lace and stitching. My tag images were distressed at the edges and some gold embossing powder was heat set onto them.


Finishing off with more lace and haberdashery embellishments. Please hop over to A Vintage Journey to see all the wonderful inspiration and find all the details to enter this challenge.

Happy Crafting,

Julie x 


Wednesday, 4 May 2016

Craft Consortium Latest Release


Hi there, lovely to have you stop by my blog. Craft Consortium are launching a New Release of their Decoupage papers this week and for my DT post I have created a home decor item.


I started off with a paper mache frame and gave it a coat of White Gesso to seal it. Next I tore sections of my decoupage paper and added on to my frame with Mod Podge matte. You will see I added my Rose Bouquet paper to the front and back for a perfect finished look.


I stamped my Doll stamp, shaded her with Copics and added her dress which had been stamped on to paper from my Wild Rose paper pad, which compliments the decoupage papers perfectly.


My centre image I added some stitching for detail onto my background paper, again from the Wild Rose paper pad and tattered the edges. Mounting onto my frame with a little tuille behind it. I stamped my sentiment and mounted onto my die cut adding these beautiful pearl and bling embellishments.


Finishing off my frame with some Chrysanthemum flowers and more touches of bling.

Thanks so much for stopping by my blog today and please check out Craft Consortium to see their full range and on Facebook for inspiration and regular giveaways, you will also find them on Pinterest, Twitter and Instagram.

Crafty Hugs, 
Julie X

Craft Consortium Products Used:


Cheery Lynn Dies Used:


LinkWithin

Related Posts Plugin for WordPress, Blogger...
01 09 10