Translator

Showing posts with label Sweet Christine. Show all posts

Thursday, 5 July 2018

Every Day of Your Life


Hi everyone, today for my DT card at Cheery Lynn Designs I am sharing some inspiration with their Cardmaker Dies. These are great Dies for putting a statement on your card especially if you need a card last minute for someone.


I started by matting my Cardmaker layer onto a layer of cardstock a few shades darker. Next I stamped my sentiment and mounted onto the same colour of card used in my background. This was then added onto my card with an accent of my Tag die behind and flourishes offset to the sides.


My flowers have been shaded with Distress Inks adding Flowersoft into the centres of the smaller ones and a sparkly gem into my Daisy.


Cheery Lynn Dies Used -

XM11 Coved Rectangle Scalloped 
B170 Mini Flourish One
CABD98 Tags #2 Set of 4

Thanks so much for stopping by today.

Crafty Hugs,
Julie x

Tuesday, 15 May 2018

Friendship


Hi everyone, today for my DT card at Cheery Lynn Designs I am sharing some inspiration using the new Retro Television from their latest release.


I chose kraft card and a patterned paper that gives my card a Fifties feel to it. My TV was shaded with Distress ink at the edges adding a Tim Holtz Chit Chat sticker and a Photo Booth picture onto the TV.


Adding a Sweet Christine flower and a Dolly in white cardstock to pop my design.

Cheery Lynn Dies Used:
B943 Retro Television Die Set 
LSC16 Rectangle Stitch and Cut Tool 

Thanks for stopping by today.

Crafty Hugs,
Julie x

Friday, 26 January 2018

Springtime Birthday


Hi Everyone, this last week in Scotland has been very cold and we have had a lot of snow and frost. Thinking of warmer days I decided to create a Birthday card for my DT post at Cheery Lynn Designs using one of their latest Pop-Up Dies - Celebrate, along with spring coloured cardstock.


I shadowed layered my word Celebrate 3 times to make it pop and incorporate the colours on my card design and flowers.


My flowers were all cut out in white cardstock and shaded in the centres with some ink. Next I shaped the petals on my Embossing mat and added Flowersoft into the centres. The smaller flowers I bunched a few together in places and added single ones too for extra detail and interest.


Cheery Lynn Dies Used:


Thanks so much for stopping by today and for the lovely comments left on my blog on our Blog Hop, it was lovely to read them all.

Wishing you a lovely creative weekend, 

Crafty Hugs 
Julie x

Saturday, 13 January 2018

Lovebirds


Hi Everyone, today for my DT card at Cheery Lynn Designs I am sharing some inspiration using a selection of their Love themed Dies on my Vintage styled Valentine card.


I started by cutting out my Heart Stackers for the base of my card adding a couple of tattered layers.


My centre heart doily and sentiment were both shadow layered to help them pop against my patterned paper. I also added some cheesecloth behind my Lovebirds image which I coloured with a little Sugar Spun Distress Stain.


My flowers were all shaped with Embossing tools on my mat. I added gems into the centre of two of them and Stickles into the centre of my Baby's Breath flowers.

Cheery Lynn Dies Used -

Thanks so much for stopping by today and I hope you have a lovely weekend creating.
Happy Crafting,

Julie x

Wednesday, 3 January 2018

Cherish Each Passing Moment


Happy New Year to all my Blogger Friends, today for my DT post at Cheery Lynn Designs I am sharing some Vintage inspiration using a selection of the beautiful Dies they have available.


Using Craft Consortiums Wild Rose paper pad I started by tattering a few layers of my papers and added onto my card with foam strips. I love the intricate details on my diecut frame to which I added some Frantage powders to give an elegant Shabby look to it.


My Flowers have all been built up with 4 layers, shaping with my fingers and adding sparkly gems into the centres, layering onto my flourishes and adding some tiny dried flowers for another detail.


Finishing my card off with a stamped fussy cut ticket, a lace ribbon and an embellishment.

Cheery Lynn Dies Used :
Craft Consortium Products Used:
Wild Rose Paper Pad
Always and Forever Flower Chain Ribbon
Always and Forever Pearl and Diamante Hearts 

Thanks for stopping by today and I hope you have a wonderful 2018.

Crafty Hugs, 
Julie x

Tuesday, 5 December 2017

Cheery Lynn Designs - Flower Power Blog Hop


Hi everyone and a warm welcome to my blog. Today at Cheery Lynn Designs we are having a Blog Hop sharing inspiration with lots of the beautiful flower Dies available at Cheery Lynn. Please be sure to leave a comment as you arrive back at Cheery Lynn Designs to be in with a chance of winning a $20 shopping Spree which is amazing especially with their end of year sale on, or why not join our new rewards program.


My card today has lots of Shabby layers on it using Craft Consortiums beautiful Wild Rose paper pad. I love this pad for making my flowers as they look so pretty with all the shades.


I used strips of my Japanese Lace Garden Frame to add a lace border on my layers. My butterflies have tiny flowers added into the centres of them.


My Chrysanthemum's have been off set at different angles and some added in bud form for a natural look. My Sweet Christine I have used 4 layers to build them up adding Gems into their centres, also adding a mix of different leaves.


My sentiment was stamped with Archival ink and layered onto my tattered Die Cut layers with foam strips for extra dimension, adding another couple of tiny flowers for more detail.


Cheery Lynn Dies Used:

Thanks so much for stopping by and I'd love if you left me a comment before hopping over HERE to Lisa's lovely blog.

Click HERE

Crafty Hugs, 

Julie x

Saturday, 15 July 2017

Veriloquent Vintage Release Blog Hop - Cheery Lynn Designs July 2017


Today at Cheery Lynn Designs is Blog Hop day and what an outstanding release of stunning Vintage Dies this is. You are going to want them all !

I squealed with excitement when I saw the Gramophone ( Phonograph Die ), it reminds me of the Gramophone that sits in my dolls house. So let me show you how I built this Die up.


I started by cutting out my Die twice in Kraft Card, once in Miri card and once in Black card. I then trimmed all the sections I wanted in each colour and kept one complete section to glue all my parts onto.


I coloured my Kraft Card with a dark red and dark brown pen to give the look of mahogany wood, gluing all the sections together. Doing this helps to give added dimension to your die cut.


I also added a little gloss varnish onto my record and cut out the middle section with an old book page. 


Finishing with touches of Stazon Rusty Brown Ink at the edges of Miri Card to age it slightly.


My sentiment was stamped with Archival Ink and mounted onto the beautiful ornate new Dusty Miller Square Die.
Finishing my card with some pretty flowers and musical notes.

Thanks for stopping by and I'd love for you to leave me a comment before you hop over to LISA'S BLOG to see what beautiful Vintage Dies she has used on her card. 

Be sure to finish the Hop to be in with a chance of winning a $20 Shopping Spree at Cheery Lynn Designs.

Crafty Hugs, 

Julie x

Cheery Lynn Dies Used :
LPC16 Rectangle Pierce and Cut Tool

Friday, 14 July 2017

Faith Hope Love


Hi Everyone, today for my DT card at Cheery Lynn Designs I am sharing a card with the elegant Die Cut sentiment Faith, Hope, Love which could be used on a variety of cards or alternatively on a Scrapbook Layout possibly with Wedding photographs.


I started by cutting out my Pierced Stacker Dies in Square and a Circle and embossed the edges with Silver Embossing powder, using Maja Design papers.


I matted and layered my centrepiece with foam tape between the layers to add dimension to my card and added a contrasting blue square of Cardstock behind my Doily to help it 'pop' gluing my sentiment onto the circle.


Using my Flourish #3 Die I cut this out in 2 shades of green card and arranged elements of this Die onto my card.


Layering an arrangement of flowers with Pearl centres onto my card.


Finishing off with a pretty butterfly.

Cheery Lynn Dies Used -

Thanks so much for stopping by today.

Crafty Hugs, 

Julie x


Sunday, 4 June 2017

Always Remember


Hi everyone, today my DT card at Cheery Lynn Designs showcases some of the beautiful flowers available from Cheery Lynn. 


My card has been made using papers from Maja Design starting by cutting and tattering the edges of my base layer which measures approximately 6 inches square, I then layered my stamped sentiment placing it behind my die cut frame with a lace Border.


My flowers have a variety of centres, my large flowers have been inked at the edges and my die cut centre added which is formed by rolling the die cut around tweezers and gluing in place. 


Once dry you simply fan out the rolled die cut add a little Ink for definition and glue in place.


My smaller blue flowers have a blob of Glossy Accents in the centre and Micro Beads poured on top with a sprinkling of Glamour Dust for added Sparkle. Finishing my card off with a spritz of white from my Chalk Markers.
Thanks so much for stopping by and I hope you feel inspired to make some flowers.

Crafty Hugs, 
Julie x

Monday, 15 May 2017

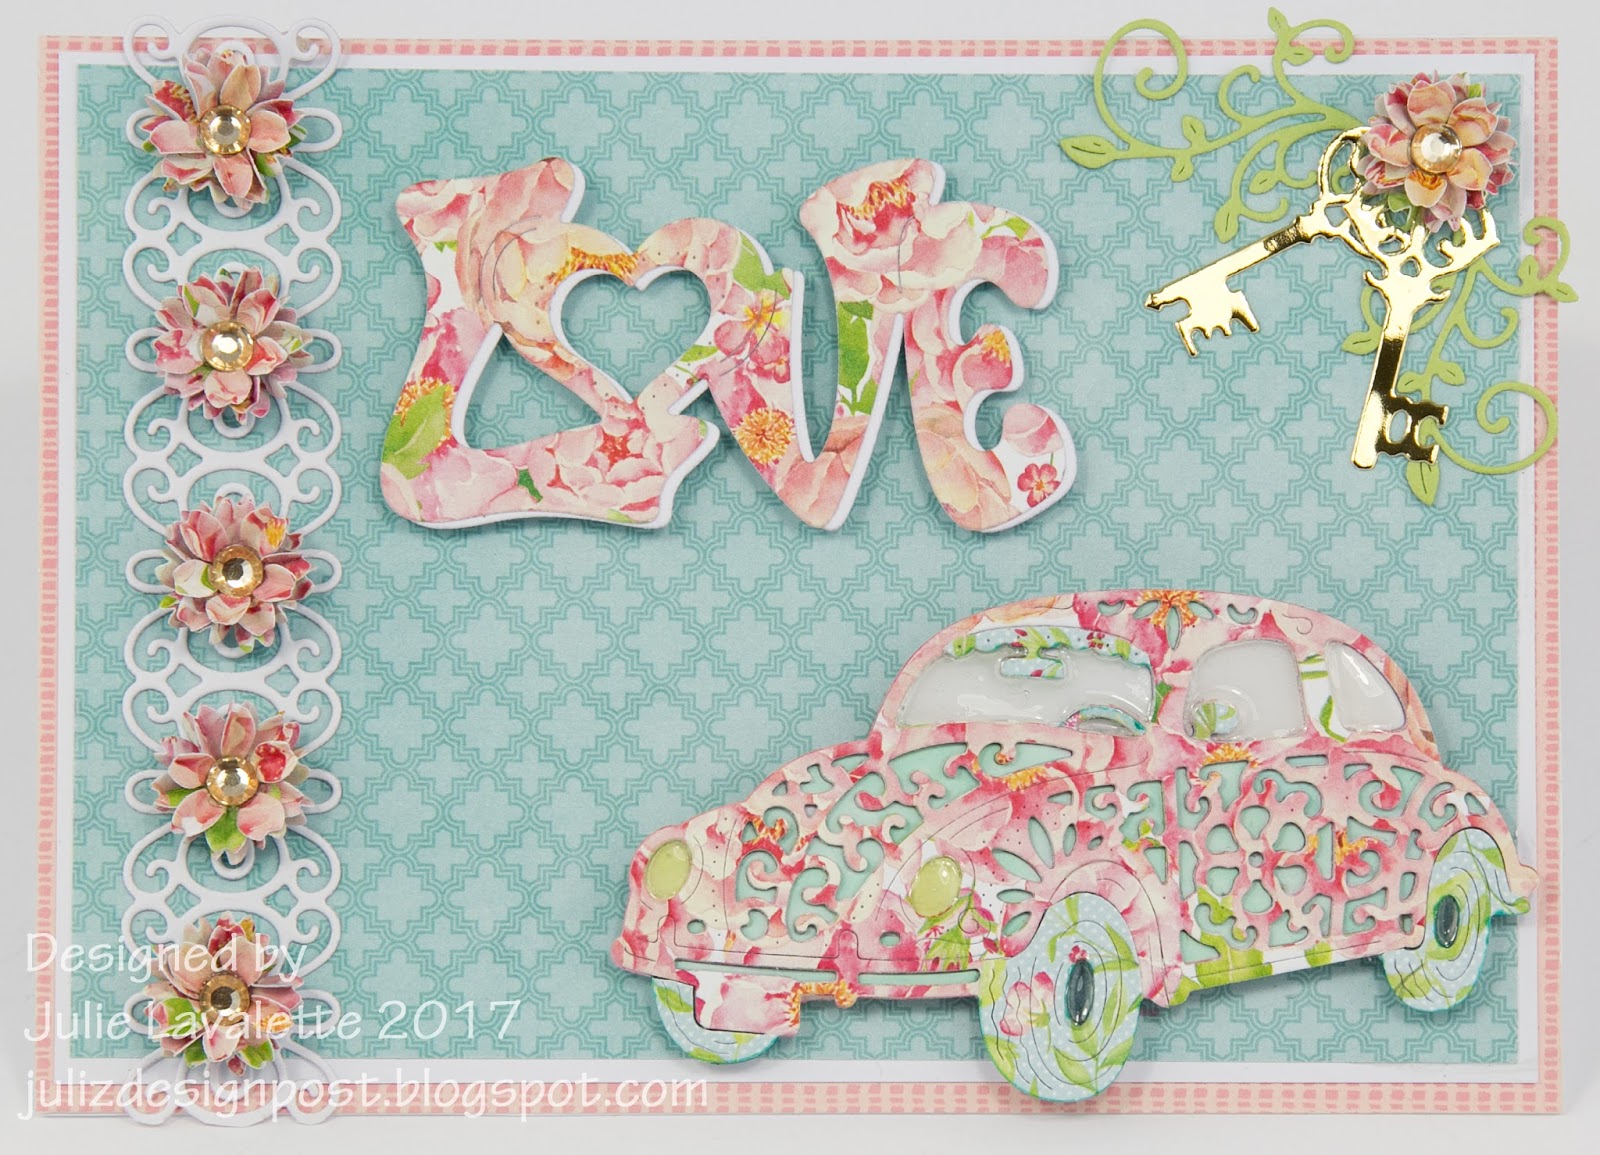
Love Bug


Hi everyone, today for my DT card at Cheery Lynn Designs I have made a fun card that would suit a variety of themes from passing a driving test, a Birthday or just to send love.


I started by adding all my base layers to my card and made up some Sweet Christine Flowers by folding the petals in half and pressing the flower in the centre on my Embossing mat. I added four layers and a gem into the centres and glued in place over my lace diecut strip. I just adore these flowers, they are quick to make and very effective.


My word was drop shadowed and glued in place with Silicone Glue to add extra dimension.


I added an accent onto the corner with another flower and a couple of keys cut from Gold Mirri Board.


My Hippy Mobile I cut out in patterned paper and glued in place onto white card which was fussy cut around the die cut. I added Glossy Accents onto the lights and windows, I shaded the body of the car with a Copic Pen and paper pieced my wheels and the sun visor in a co-ordinating colour.
Thanks so much for stopping by today and for the lovely comments you leave, I appreciate them so much.

Happy Crafting, 
Julie x

Monday, 13 March 2017

Happy Mothers Day


Hello everyone, here in the UK we celebrate Mother's Day this month so for my DT card at Cheery Lynn Designs I thought it would be nice to share some inspiration that could easily be adapted into many other occasions by changing the centre sentiment.


Using Craft Consortium's paper pad "Wild Rose" for my card I cut out my Heart Stacker Die and layered on my Stitched Squares which I distressed at the edges to give a material patchwork effect. 


Next I layered my Doily onto the centre.


My flowers were cut in White Cardstock and shaded with Distress Inks adding Flower Soft into the centres of one of my favourite smaller flower Dies - Sweet Christine and my Chrysanthemums I added gems to their centres.


My heart I backed onto White Cardstock and kept all the negative cut hearts adding onto my card for extra detail.

Thanks for stopping by and I do hope you have a lovely week with some time to create.

Happy Crafting, 

Julie x   
Cheery Lynn Dies Used :

LinkWithin

Related Posts Plugin for WordPress, Blogger...
01 09 10