Translator

Showing posts with label Birdbath Set. Show all posts

Monday, 14 August 2017

Songbirds


Hi everyone thanks for stopping by, today for my DT card at Cheery Lynn Designs I am sharing some more inspiration using their fabulous new Vintage Dies.


My card has lots of layers using coordinating papers from Pion Design. I started by Die cutting my layers and adding Gilding Wax around the edges. This was to compliment my Gilded Birdcage and to give an opulent feel to my card.


You will also notice my diecut corners have had Gilding Wax rubbed all over them.


The corner of my paper was placed into my Die and cut to give a curved edge and I fussy cut around the bird and foliage, mounting in place with some Silicone Glue and a touch of Cheesecloth.


My centre layers I layered in place with foam tape for added dimension, adding some sweet birds onto my Birdcage for extra detail.


Finishing with a pretty Floral bouquet, some die cut feathers and bling.

Wishing you a lovely week.

Happy Crafting, 

Julie x

Cheery Lynn Dies Used :
LPC12 French Flair Pierce and Cut Tool

Saturday, 5 March 2016

Happy Mothers Day


Hi Everyone, in the UK this weekend we celebrate Mother's Day, so for my DT card at Cheery Lynn Designs I thought it would be nice to share some inspiration with you all.

B663 - Die Photo 


I used this wonderful newly released Sunflower Die on my card. You will notice on this die cut you get the small seed box that is for the centre of your flower. Detail is always so important to Cheery Lynn and this is why I love their dies so much, as I can get such a realistic look onto my cards with their dies.


I started off my card by cutting out my Stitched Stacker in white cardstock, blending on Distress Inks and adding my stamped sentiment around the edges. Layering onto my brown cardstock , I tattered both layers at the edges for some added texture.


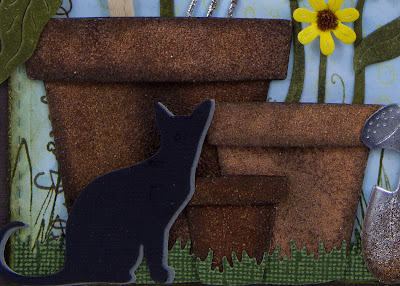
My terracotta pots were each die cut out twice and shaded with a brown Copic pen. I then pressed the die cuts into my Versamark Ink pad and added a mix of Tea Dye and Vintage Photo Distress Powders, heat setting in place. I blended a little Black Archival Ink around the edges and onto the centre for an illusion of them curving. You will also notice I added on an extra layer just to the rim of the pot for an added 3D look. Finishing them off with a little grass at the base.


My Sunflower petals were shaded with a bright yellow Copic pen, with a little touch of a pale orange towards the centre. I shaped 3 flower head layers on my embossing mat and layered them onto my stem and leaves.


On my seed box part of the die I applied a generous amount of glue and poured on some Bronze Micro Beads. Once dry I dripped some Black Alcohol ink on to  it to mimic my seeds. I placed in the centre of my Sunflower and then added some Earth coloured FlowerSoft around the outside of my seed box.


My Watering Can was altered using the same technique as HERE. My gardening spade and fork I coloured the handles with a brown Copic pen and used a peeled paint texture stamp and a little white Acrylic paint so it gave me the effect of the paint peeling off the handles. I used Versamark ink and Silver Embossing Powder on the spade and fork bases. Once this started to melt I sprinkled on a little Vintage Photo Distress Powder and continued to melt it, giving me a rusty worn look. I finished off my spade with a small garden bird.


My card was finished off by adding a Coffee Stirrer into my Terracotta Pot with a stamped sentiment.

I do hope you like my card and feel inspired to try these effects on your die cuts.  Our new Fortnightly Challenge at Cheery Lynn Designs just started on Thursday, this time the theme is Doilies, look forward to seeing your entry.

Thanks for stopping by today and for the continued comments you leave, I love reading them all.

Crafty Hugs,
Julie x

Shop at Cheery Lynn for:


Saturday, 4 October 2014

Nice Little Things

Click to Enlarge

Hi Everyone,  with winter now just around the corner here in Scotland, I have started to feed our Garden Birds once again. This week my Cheery Lynn DT card is inspired by them and the Summer flowers that are now all disappearing.

Let me show you previous layers again on this card to make it easier to understand how I made it.


You will see I layered my French Flair Doily stackers rotating the following layer to a diamond shape and I paper pieced in my Snowflake Doily at the back.


I shaded my leaves,birds and birdbath with distress inks and my flowers were coloured with Copics.


I stamped my verse, added a little distress and accent stamping to soften the sharpness of the white card.

Happy Crafting,

Julie x


Shop at Cheery Lynn for :


Saturday, 13 September 2014

Brr It's Cold Outside


Hi everyone, thanks so much for all your fantastic comments on my previous two posts, it's so much appreciated and does wonders for my creativity. This week the challenge at Cheery Lynn Designs is to use texture on your card, so for my DT card I injected lots of textures in to this card.

I used the brick plate and ran some co-ordinations paper through my die cutting machine and then sanded it back to reveal the coloured core. Next I die cut this piece of paper and sprayed some glue onto it and added extra fine glitter for a frosty feel.


My tree I layered up and sprayed with some gold mica spray and dried with my heat gun. This helps to curl the paper and gives it a firmer feel. I added Flower-soft snow, glitter, red stickles, my little birds and snowflakes all to give a winter feel. The Tree comes with some wonderful decorations dies also and you can see it decorated here on one of my previous cards.


My window I wanted a frosty feel to, so I added some icicles....I adore this die. They we're die cut in white card with a little distress added to the points of them, I then sprayed glue and added glitter too them and placed onto my window frame with a little snow. I also made some curtains for behind my window using my Cuties strip die.

My wording I layered up twice for a shadow effect. I wish you could see all the sparkle on this card but the camera has unfortunately only picked up a bit of it.

Cheery Lynn New Release dies used:

Texture Plate used:

Other dies used:


Thanks for stopping by today and I'd love it if you had time to leave me a comment. Hope you all have a creative weekend.

Julie x

I would like to enter this in to -
Sugar Creek Hollow - Word Play Challenge

Saturday, 23 August 2014

A Little Birdie Told Me


Hi everyone, I hope you are managing to get some creative time to yourself. 
Today I have made a little Mediterranean inspired card for my Design Team card at Cheery Lynn Designs. My husband and I love to go to the island of Majorca where you see many white washed houses with shuttered windows.


My window was cut out of a cereal packet which I then painted to give a shabby feel. I mounted the window onto a little grey card, placing a little spider ribbon behind to give the illusion of a net curtain. I then added my Anastasia border behind to look like curtains. Don't you just want to peek in the window ! I love having the little window box as it is a lovely finishing touch to add the Wow factor.


My Penny Farthing I cut out twice in black and once in silver card stock, paper piecing it back together over the first complete die cut. My little birds were highlighted with some distress inks.


My brick wall was made using Cheery Lynn's embossing plates, please check them out here on the shop blog. I rubbed some distress ink over the embossing plate, placed a white piece of paper onto it and ran through my die cutting machine. So easy to do with fabulous results.

I hope you have enjoyed looking at my card today and I have managed to inspire you. 

Julie x

Cheery Lynn dies used:


Saturday, 7 June 2014

Gone Fishin


Hello there Blogging friends and also a warm welcome to my new followers. This week for my DT at Cheery Lynn Designs I combined our challenge of red, white and blue into my card.


 I matted and layered my seaside themed papers using the stacker dies, to make them look like a picture frame with a little scene inside. I used the new Old Barn Board die which comes with the words, log and fishing line. The log was cut out in Kraft paper and I distressed the edges, I placed a few foam pads in the middle and glue at the edges this added more dimension to my card. My stamped image had a fishing line on it, which I cut off. You will see the extended bit on my fishing line is now made using my die, don’t you just love the little hook on the end of this. I pressed the hook into my embossing ink and double embossed using silver embossing powder and threaded a few beads through it to give a 3D look of a float on the line.


My birds are from the birdbath set and my little Starfish was made using the leaves from the miniature rose die.
 I am off to sunny Majorca for a week, my daughter works in the Airline Industry so nice cheap flights, we couldn’t say no to, so my post next week will be a scheduled one. Look forward to catching up with all your blogs when I get back.

 Thanks for popping by my blog and enjoy your weekend.


Julie x

Shop at Cheery Lynn for –


LinkWithin

Related Posts Plugin for WordPress, Blogger...
01 09 10