Translator

Saturday 30 January 2016

Cool Dude


Hi everyone, today for my DT card at Cheery Lynn Designs I am sharing a card using the New Release words Cool Dude, let me take you through my techniques.


My centre die cuts were all layered twice for a shadow effect. My Palm tree was shaded with Copics and a little Distress Stickles added to leaves. My wording and arrow were all heat embossed with Red Tinsel Embossing Powder to make them stand out within my design. 


I re-inserted my letters to the surf board after heat embossing them in the same way as above.

The current challenge at Cheery Lynn Designs - Anything Goes is open until 3rd Feb. It would be lovely to have you join in the fun, with a chance to win a shopping spree of $20 at Cheery Lynn Designs.

Crafty Hugs, 

Julie x

Shop at Cheery Lynn for:


Tuesday 26 January 2016

Madame Butterfly


Hi Everyone, Today for my DT post with Craft Consortium I am sharing another card using the newly released paper pad English Garden.


I started off by choosing my papers to compliment my stamped image and coloured in my Butterfly lady with Distress Pens, mounting her onto layers of paper tattered at the edges from the English Garden pad and a plain cardstock from my stash.


Finishing my design with pearls a resin rose, die cuts and a little cheesecloth.

Many thanks for stopping by today and be sure to check out Craft Consortium on Facebook for inspiration and regular giveaways. You will also find them on Pinterest, Twitter and Instagram.

Crafty Hugs, 
Julie x

Craft Consortium Products used :


Cheery Lynn Dies Used:
  • Italian Flourish Doily
  • Tiny Italian Flourish Doily
  • Sienna Double Edge Border

Saturday 23 January 2016

Just Married


Hi Everyone, firstly I would like to thank you all for your lovely visits and comments on my blog during the Cheery Lynn blog hop last week, you really made my day. Today for my DT card at Cheery Lynn Designs I am sharing a Wedding card using the New Release words 'Just Married'. Let me take you through my techniques used on this card.


I used pearlised cardstock for my stacker layers and used a Silver Pen to shade all my Silver accents and scalloped layers. My top stacker layer I embossed with my Hearts Embossing Plate.


My Bride I glued on an overlay of lace and once dry replaced back into my Die to trim off the excess lace. I shaded the Happy Couple with Distress Inks and added some Bling and a Floral Bouquet.


My Chandelier was coloured with a Silver Pen and a little touch of Gold Gilding wax on the Tassles. For my candles I painted on a little Beeswax I had melted in my Meltpot, the flames were shaded with Copics and a touch of Glossy Accents added. Finishing it off with lots of bling.

Thanks so much for stopping by today.

Crafty Hugs, 

Julie x

Shop at Cheery Lynn for:

Thursday 21 January 2016

Tea Party


Hi there and welcome to my new followers. Today I am sharing another DT project for Craft Consortium using their new Paper pad called Wild Rose.


When I noticed this MDF Teacup in our local bargain shop I just knew it was begging to be altered.


I used the shape as a template to draw around my sheet of paper and cut it out. I went around the edges of the shape with some pink paint and added a layer of white crackle paint. Once dry, I glued my paper in place.


I applied a layer of Crackle Glaze over the paper to make it look like crazed porcelain rubbing in some Antiquing Cream to highlight the cracks.


My doll stamp was shaded with Copics, fussy cut and I stamped her dress onto the Wild Rose papers and layered on, attaching some bling.


My Resin Roses I rubbed a little Gesso onto and once dry added some Stickles over the top.


My Tea Party image was stamped and shaded with Distress inks, mounting onto die cuts.


I complimented this image with my teapot/cups and cats.


Finishing off with some ribbon and lace.

Thanks for stopping by today and please remember to follow Craft Consortium on Facebook for regular giveaways and inspiration. You will also find them on Instagram, Twitter and Pinterest.

Crafty Hugs,

Julie x


Cheery Lynn Dies
  • Fiona's Magic Mirror
  • French Pastry Doily Die
  • Kitty Kitty Meow Meow 
I wish to enter this in to the following challenge:


Tuesday 19 January 2016

Feathered Friends


Hi Everyone, Today I'm sharing with you all my DT Post for Craft Consortium using their gorgeous new paper pad called English Garden and a couple of embellishments from their Always and Forever collection.


My layers of paper were all distressed at the edges by running the blade of my scissors lightly around them. Next I rubbed my Versamark ink pad onto these edges and added Gold embossing powder and heat set. I also scattered some onto the paper heating from behind so it wouldn't blow off.


My image was stamped and coloured with Distress inks, tattering the edges and adding some gold embossing powder, mounting onto a die cut heat embossed frame with a little lace.


I layered my card up adding some flowers, pearls and a small key.

Thanks for stopping by today and please remember to follow Craft Consortium on Facebook for regular giveaways and inspiration. You will also find them on Instagram, Twitter and Pinterest.

Crafty Hugs,

Julie x

Craft Consortium products:

Cheery Lynn Die Used:
  • Alpine Flourish Doily 

I would like to enter this in to the Following Challenge:

Saturday 16 January 2016

Cheery Lynn Designs Jan 2016 Blog Hop


Welcome to the Cheery Lynn Designs January New Release Blog Hop. We are all so excited to showcase the fabulous new dies that were just released. I am the first blog on the hop so at the end of my post just click on Lisa's name to get to your next stop on the hop.

Cheery Lynn make the most amazing Bird Dies with incredible detail and for my DT post today I am using the newly released Stork and Baby die. The Stork comes separate from the baby so you have different variations of using this die.


I started off by using my Hearts embossing sheet with white cardstock and rubbed over lightly with some Distress ink to highlight the hearts. My Doily was cut out and backed onto my Angel Wing. I then cut in half and placed at each end of my card.


My Stork and Baby were shaded with Copics, I added a little gem and some black Liquid Pearls to its eye and highlighted the swirl detail with a glitter pen. Mounting onto another heart embossed mat and layering onto my Its a Boy banner.

Thanks so much for your visit today and I would love if you leave me a comment to let me know you have stopped by on the BLOG HOP. Be sure to head over to your next stop which is LISAFollow through to the end of the hop and leave a comment on the Cheery Lynn Designs Blog too for a chance to win a $20 gift certificate.

Julie x

Cheery Lynn Dies Used:


Friday 15 January 2016

Cheery Lynn New Release January 2016


Hi Everyone, today I am super excited to be showcasing along with my Teamies at Cheery Lynn Designs their January 2016 New Release which has been launched at the CHA Show in California. It is a true honour knowing my cards are on display at this show. This is an amazing release with so many new dies added onto my Wishlist.

My card today showcases the beautiful Fern and Birds Nest with Eggs.


The Fern has beautiful detail and will make a wonderful accompaniment to any Floral Arrangement. The Birds Nest die comes with a choice of 3 different sizes of eggs and 2 nest shapes. Isn't it cute with the addition of my little Bird.

Please head over HERE to see my Teamies creations using some more of the New Release and the Cheery Lynn Shop for the full range.

I'd also love if you stop by my Blog tomorrow where I start a Cheery Lynn Blog hop with my Teamies and you have a chance to win $20 worth of dies. 


Crafty Hugs,

Julie x

New Release Dies-


Shop at Cheery Lynn For:

Also used Craft Consortium - English Garden Paper Pad

Thursday 14 January 2016

Craft Consortium New Release-Wild Rose Paper Pad.


Hi Everyone, this week Craft Consortium are releasing 2 stunning New Paper Pads. This one on my card is called Wild Rose, isn't it pretty.

I die cut out all my squares with a Stitch Square Stacker. This is a great way to use up those little scraps of paper and for me to showcase a mix of the papers in the pad for you all to see. I tattered them at the edges adding a little Distress Ink to give a look of quilted material, placing my design on my card.


My sentiment was stamped, adding some handmade flowers, buttons and a few touches of glitter to finish. I love the pretty vintage look these papers have.

Please do check out Craft Consortium on Facebook, Twitter, Instagram and Pinterest. They have regular fab giveaways and inspiration for all.

Thanks for stopping by today and thank you to all who left me lovely comments on my Gypsy Gypsy Wagon they were very much appreciated, if you haven't seen it you can click HERE to view.

Crafty Hugs,
Julie x

Products Used:
Craft Consortium - New Release Paper Pad - Wild Rose

Dies used are Cheery Lynn except Wreath

Tuesday 12 January 2016

Gypsy Gypsy Caravan


Hi Everyone, Today I am super excited to finally be able to 
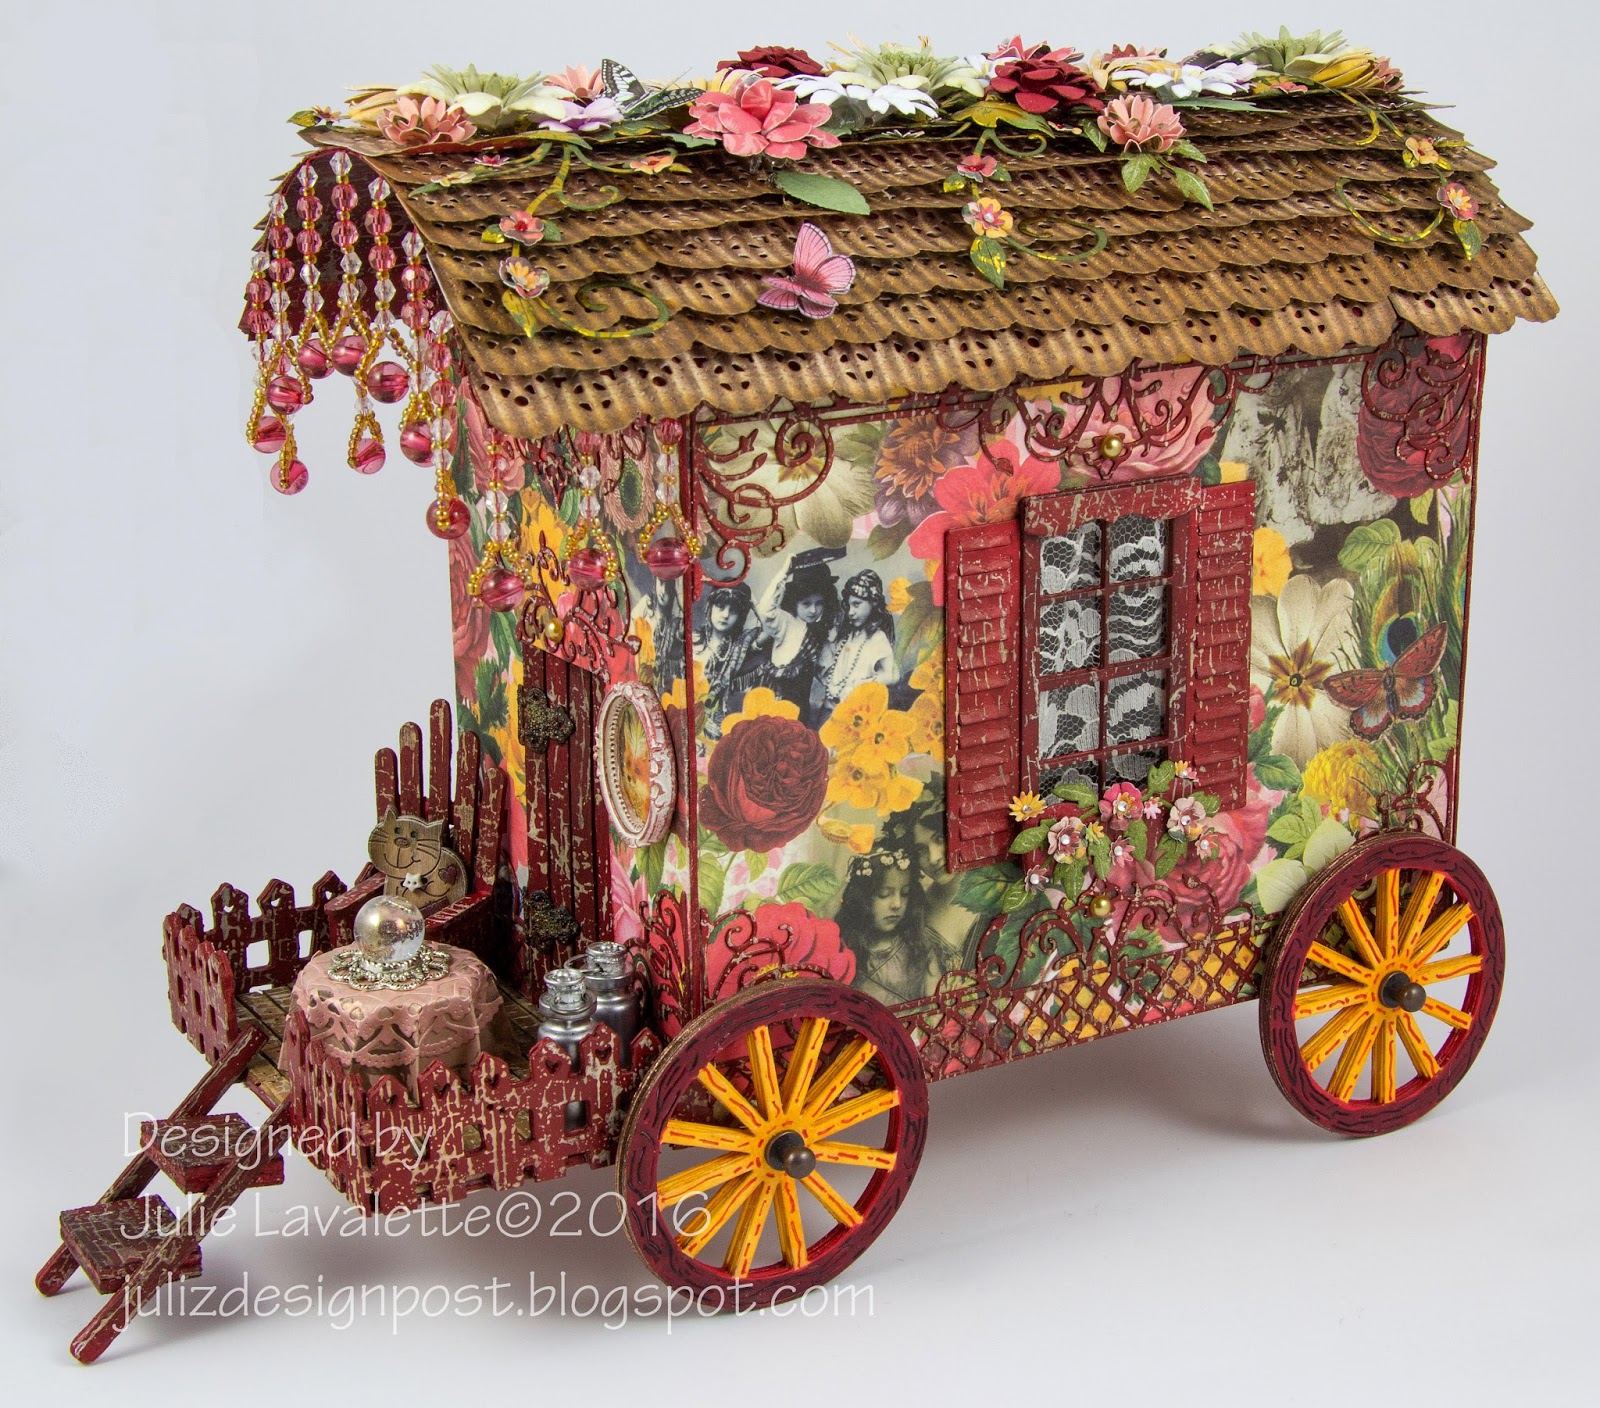
show you my Gypsy Caravan I made for my DT post with Craft Consortium using their gorgeous Gypsy Gypsy Paper Pad....very apt don't you think !

My Gypsy Wagon will be going off on its travels to Frankfurt to a large Trade Show at the end of January, isn't that exciting !  So I needed to make it sturdy enough to withstand several journeys, so I attached my paper to chipboard to reinforce the walls.


My Wagon Wheels were cut out from a Cereal box several times gluing and weighting them down to dry. I then coloured them with Copic Pens and added some Gilding Wax and a Hitch Fastener to the centres.


My Windows and Flourishes were also cut and layered from a Cereal Box and painted with a complimentary red paint. Using Gesso I stamped on my peeled paint effect with Andy Skinners Industrial stamp set.


Once dry I rubbed over with a Potting Soil Archival Ink to shabby them up.


For my fence and door I used the same effect as on my windows.


My seat, floor and door are all made from Coffee Stirrer sticks. My milk churns are small glass bottles covered in Alcohol Inks with a stud fastener and a metal ring added to them. My tablecloth highlights another paper from this paper pad. My crystal ball is a glass marble sitting on a jewellery finding. My cat is a little button.


My corrugated roof showcases another paper from the pad, I love the look it gives. Craft Consortium also do a matching Corrugated Decoupage paper which I lined over the base of my wagon.


My roof flowers were made using Cheery Lynn flower dies. Some are cut from the Gypsy Gypsy Pad and others shaded with Distress Inks, I tried to copy some of the flower designs on my wagon walls. The butterflies were fussy cut from the paper pad too.

Now I'll just let you enjoy some more close up photographs.


The flooring inside the wagon is a paper sheet from the Gypsy Gypsy pad.


This is the second time I have made a wagon ( See the older one HERE ) and the design is purely out of my head without following any templates, but this time I changed the dimensions slightly and used some different techniques.

Please check out Craft Consortium on Facebook, Pinterest, Twitter and Instagram to keep up with all their new products and fabulous give-aways.

Thanks for stopping by today and would love if you left me a comment,

Crafty Hugs,

Julie x

Products Used:


All dies from Cheery Lynn Designs ( Except Fence ) 

I would like to enter this into the following challenges :

Tuesday Throwdown - # 276 Add Dimension
We Love 2 Create - Anything Creative/Mixed Media Goes Goes
Frilly and Funkie - Holiday Hues Challenge
Creative Artiste - Challenge 10 
Scrap and Craft Inspiration - #17 New Beginnings ( New Home )  
Anything But Cute - Challenge - Ring out the Old bring in the New (Cat Button and Crystal Ball Bought for) 
Dies R Us - Challenge #40 Something New 
Rhedds Creative Spirit - January Challenge ( Coffee Stirrers and Cereal Boxes Used ) 
WLVC Challenge - #61 Anything Goes With Vintage Lace 
Live and Love Crafts - Challenge #43 Something New (Cat Button and Crystal Ball New)  
Emerald Creek Dares - New Challenge (Cat Button and Crystal Ball New)


Saturday 9 January 2016

Create Flowers


Hi Everyone, now that the Christmas season is over I thought it would be nice to make a card filled with summery flowers for my DT post at Cheery Lynn Designs.


My card has lots of layers, tattering at the edges, adding Frantage Powders and tucking in doily accents. My inverted scalloped edge was made using a piece of waste paper and cutting out a scalloped square. 


My Watering Can was painted with Pewter Distress Paint and adding some Archival Ink for shading. I then added a little Grass to the base and on the top of the Watering Can I shaded with a Pale Blue pen and added Glossy Accents for a watery look. 


I cut out 2 of my Leafy Flourishes, placing one on my card, the other I cut into sections and placed into my design with my Flowers which have Flower Soft added to their centres. 

Thanks for stopping by today. 

Julie x 

Shop at Cheery Lynn for:


Saturday 2 January 2016

Happy New Year 2016


Happy New Year to everyone, let's hope 2016 is a wonderful year ! Today for my DT card at Cheery Lynn Designs I have made a celebration card that could easily be adapted into another type of card by simply changing the words.


I started off by cutting layers using plain and patterned Cardstock ( Craft Consortium - Bloom Beautiful ) and tattering the edges of the faux stitched layers.


I layered up my Ornament Flourish and Word dies twice to give a shadow effect.


My Sentiment Tag was also tattered around the edges.


Finishing off with a few sparkly gems and a double layered Butterfly.

Crafty Hugs and I hope you have a nice weekend. 

Julie x


Shop at Cheery Lynn for:

Also Used:

Craft Consortium - Bloom Beautiful Paper Pad 


LinkWithin

Related Posts Plugin for WordPress, Blogger...
01 09 10