Translator

Saturday 28 March 2015

Tea Party


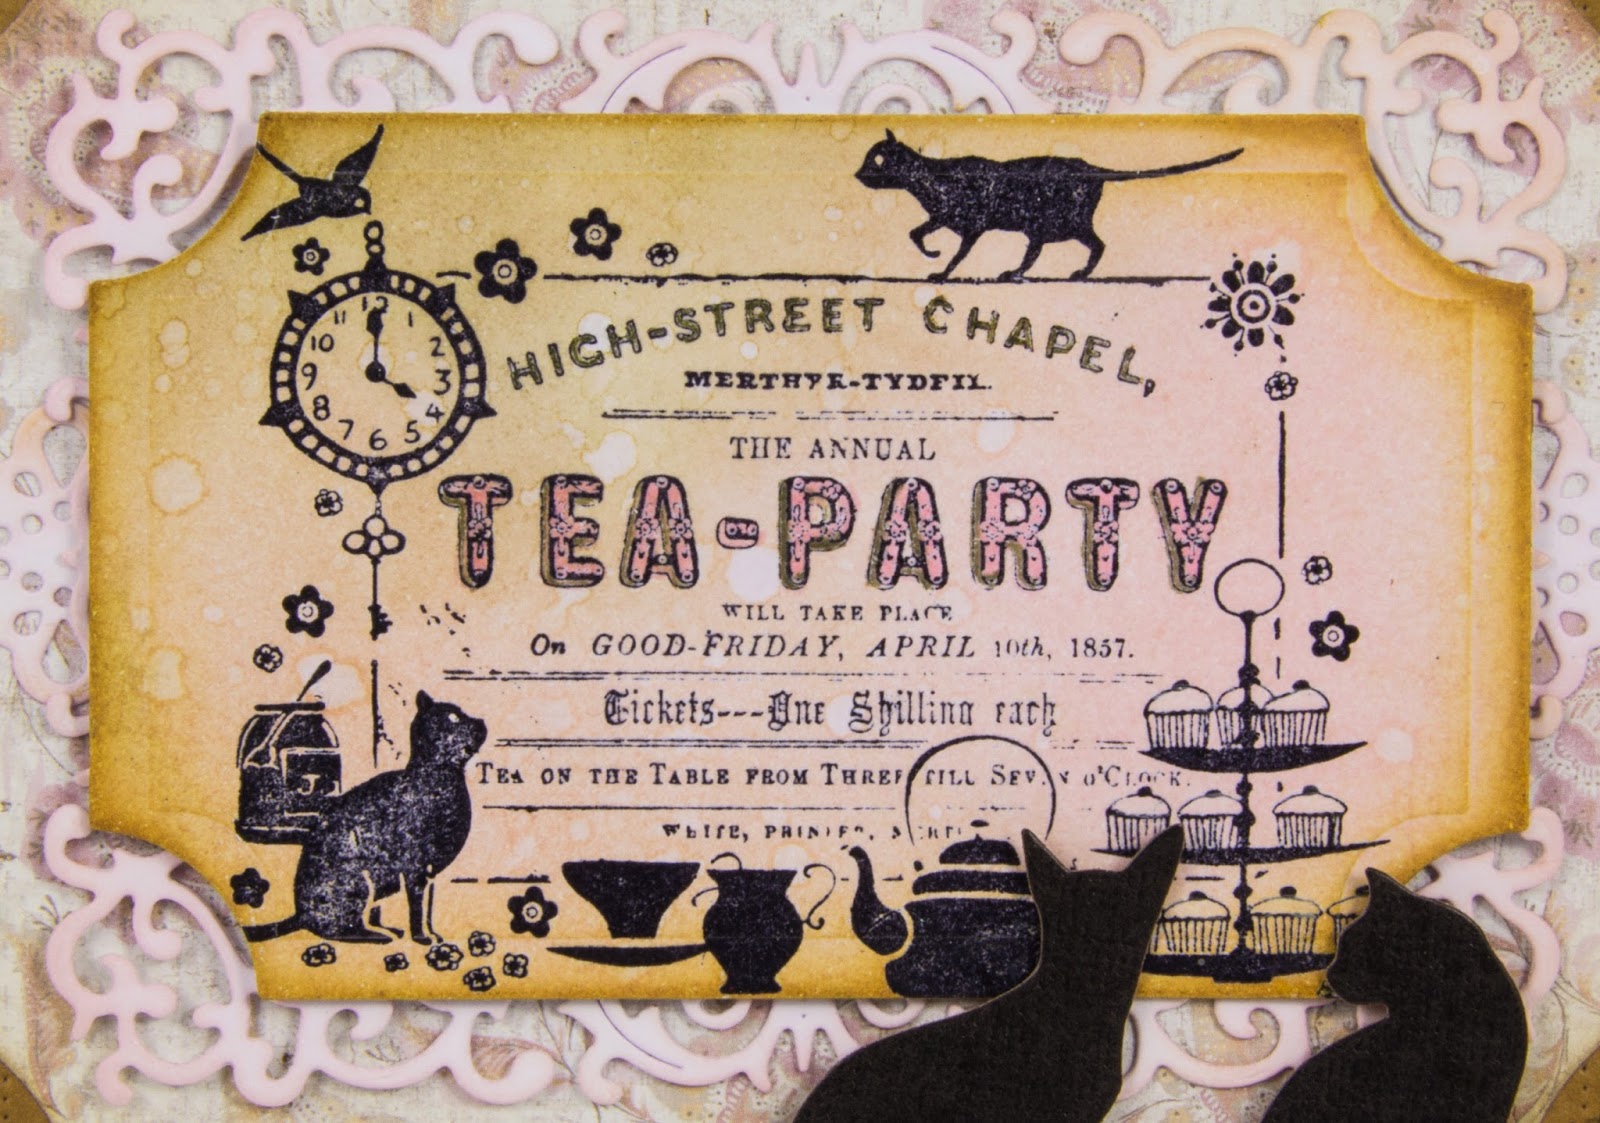
Hi Everyone, thank you for all your lovely comments last week for my Daffodil tutorial they were all very much appreciated. When I was a little girl I loved having Tea Parties with my pet cat - Lucky, who would sit quite happily watching me. This inspired me to make this card for my Cheery Lynn Designs DT post this week which I am sharing with you all today.


Notice how I have mounted my corner die cuts behind my card layer to give a different look and softened the edges of my paper with Ink for a Vintage look.


My layers now together mounted onto my card which measures roughly 6.5 x 5.


My centre image was stamped in Black Archival ink and heat embossed with clear ink. I added Distress ink to age and shade my paper, placing onto the Alpine Flourish Doily with a little Silicone Glue to raise my topper slightly.


My cute little cats were also placed on with Silicone Glue. Aren't they adorable !

Thanks for stopping by today to see my post and I will see you all next week.


Julie xx

Shop at Cheery Lynn for:
I Wish To Enter This In To - 

Crafty Individuals March Challenge - The Animal World. 

Saturday 21 March 2015

Daffodil / Narcisi Flower Tutorial


Hi Everyone and a huge welcome to my new followers. I would just like to thank everybody so much for their lovely comments on my Spring Bouquet last week, I loved reading them all. I had a few people requesting a tutorial on how I made my Daffodils out of the Cheery Lynn Black- Eyed Susan Strip, so here it is for my Cheery Lynn Designs DT post.


These are the products I used to make my flowers. It is important to use Watercolour card for this technique and a Dye based ink. I found the Adirondack Ink (Sunshine Yellow)  kept the vibrance on my flowers the best out of all the Dye inks I have.


Spritz the die cut flower with water to dampen the paper but do not soak as it will go too limp. I like to press the water into the paper, then fold the flower as shown.


Keeping a tight grip on your petals, press and rub into your ink pad. Next dip into the water, lift out and press to remove excess water. You will now see how the ink has travelled down your petals to colour them. If you wish a stronger colour repeat the process.


Carefully open your flower back up. Pinch the ends of the petals as shown and press against your thumb to form the shape of your Daffodil. Dry with your heat gun re-pinching the ends of your petals half way through to re-tighten. Continue until totally dry. Your paper should now feel firm.


Cut the die cut strip in half winding around a cocktail stick repeating the colouring and drying process. I like to work with Pergamano or Cosmic Shimmer glue as find it grips quickly and doesn't soak into the cardstock /paper making it limp.


Cut a petal out of your flower to give the look of a Daffodil and press in the centre with your embossing tool.


Next put a little glue at the base and around the sides of the centrepiece.


Position the petals around the centre and hold in place for a couple of minutes.


Leave until almost dry and then start to pull petals back to open your finished flower. 


The bud is made in the same way without the centre piece. Just add a little glue and crush the petals gently together. Notice how I covered the base of the bud with a leaf and a little grass for a realistic look.


I die cut my Chicken Wire adding randomly Rusty Hinge distress stain.


Next I added Versamark ink along with Silver and Verdigris powders and heat embossed to give the look of rusty chicken wire.


I added Brushed Corduroy, Mustard Seed and Chipped Sapphire onto my tag. Spritz and flicked. I then layered on stencils and a little text stamping for more interest.


Accents of the Chicken wire were added onto my tag.


My Butterfly was shaded with Distress Inks and layered up 3 times for dimension and some bling added down the centre.


Here are the flowers once again on my finished tag with the beautiful Mayan Butterfly. 

I hope you have enjoyed my tutorial and I look forward to seeing all your beautiful Daffodils that you create for your own projects.

Also, welcome to our new talented Design Team members, Lisa, Jenny and Eva. Click HERE to read all about them over at Cheery Lynn Designs. 

Happy Crafting,

Julie x

Shop at Cheery Lynn for :


Wednesday 18 March 2015

Tim's Tags of 2015 - March


Hi Everyone, Tim's tag this month is showcasing his enameling technique, something I hadn't tried before. I am pleased with the results and am sure I will use on future projects.


When I saw Tim's Tag I decided to be brave this month and go for the bright colours, as I tend to shy away from them. I got as far as finishing my enamelling on it, but was lacking inspiration to carry on with the bright colours staring up at me. So I restarted in vintage tones which you now see on my finished tag.


Apart from the shades of colour being different on my tag, I also used my Distress Pens to add a little more uniformed shading into part of my Butterfly.


I used a Penny Copper Metallic on top of the Texture Paste.


I also distressed the corner of my tag slightly and added a little Rose Gold Treasure Gold onto it along with 3 little star brads and my sentiment tag.


Finally a few beads from a broken bracelet were added on to my Butterfly to finish.

Thanks for dropping by my blog today and good luck to everyone entering Tim's Challenge this month. 

Julie x

I wish to enter this in to Tim's Tags of 2015 March Challenge

Saturday 14 March 2015

Spring Bouquet for Mum


Hi Everyone, spring has definitely sprung here in Scotland and this weekend we also celebrate Mothering Sunday. So I decided with all this in mind to make a Mother's Day Card for my DT card at Cheery Lynn Designs.


I started by layering up paper which was distressed at the edges and the Mini Italian Flourish was cut out in white card and inked with Shaded Lilac Distress Ink.

  
I then layered on the co-ordinating Italian Flourish Doily which I had folded in to a concertina and opened back up to give texture, it had also been inked in the same way. You will see I used the Trellis Die for the stems of my flowers.


I Love these Bows, a perfect accompaniment to a bouquet of flowers.


I got carried away and forgot to take some more ongoing pictures, so here are the close ups. Notice I have some closed buds as well as flowers about to open to add a realistic look to the flowers.


My Baby's Breath Flowers and Tiny Flower Kit I added a little stickles to their centres.


A couple of angled shots to give you an idea of the depth of the card.


The finished card once again. 


Thanks for stopping by today and I hope you feel inspired to make a Floral Bouquet for your precious Mum. 

Julie x

Shop at Cheery Lynn For :
I wish to enter this card in to :

Scrap and Craft Challenge #4 - Mothers Day
Country View Crafts - Anything Goes Challenge
Inspiration Emporium - Spring Blooms Challenge
Crafty Cardmakers - #134  For A Special Woman Challenge
That Craft Place - Mothers Day/Anything Goes Challenge

Saturday 7 March 2015

Vintage Easel Card


Hi Everyone, for my DT Card at Cheery Lynn Designs today, I am sharing with you how to cut an easel card using your dies. Let me talk you through my photographs.


My card was folded in half. Notice how I have placed my die slightly off the edge of my card so it doesn't cut my fold when I run through my die cutting machine. I next placed the die to the opposite end and cut. I now had my shaped card.


My topper was cut to form the top of my easel card in white and patterned paper for the top and bottom part. You will also see in the second photo how my folded card looks opened up. My layers were glued to form my easel.


My doily was double heat embossed for a smooth finish and some bling added into the centre of the flowers.


Love these little butterflies for an accent. I double layered them and added a touch of bling to the centre.


My Rose was cut out of white cardstock and a little Frayed Burlap Distress ink added. This was then mounted onto my bow with a few leaves, my corner die and little butterflies.

the 

Thank you for stopping by and I appreciate all comments left, see you again soon.

Julie xx

Shop at Cheery Lynn for : 

Friday 6 March 2015

1st Birthday Celebrations at A Vintage Journey


Hi Everyone, This week marks our 1st Birthday Celebration at A Vintage Journey and what a party we are going to have with our lovely followers. The challenge for the following month will be Anything Tim, with amazing prizes donated from the man himself - Mr Tim Holtz and our kind sponsor Countryview Crafts and Anne from our DT. We also have some very exciting news, so do pop over HERE to see all the details and my super talented team mate's projects. You are in for such a treat !

For my DT project my inspiration behind this was our 1st Birthday Celebration at A Vintage Journey. After all a party just wouldn't be a party without a Birthday cake. 

This is a picture heavy post and I have tried to keep the written description to a minimum. If there is anything you would like to know please email me or leave questions in my comments box and I will reply.


My cake is just over 6 inches in diameter with a depth of almost 3 inches. I decided to use Tim's collage Technique for my strip around the cake as I had to put a join in my paper which hid it beautifully only making one visible join using a couple of screw brads and it added strength to my cake.


I find adding paint to lace especially on a 3D project makes it easier to adhere on.


Double layering papers together for added strength.


I now started to construct my cake. Giving this plenty of time to dry I started to work on my embellishments for the top of my cake.


My candle was made from a Sizzix die called Candles. I formed 4 layers together to get my 3D effect.

I added a coat of Beeswax to my candle with a brush then started to add drips from candle wax for a realistic look, rubbing on a little Gilding Wax and Perfect pearls to add shades of light and dark to candle.


I poured some Utee into my Jewellery finding and quickly placed my candle in the centre whilst still hot. Once cooled I glued the Utee onto the metal base as it releases from the metal when cool.


The finished result which I love.


With Tim having a love of game pieces this gave me the inspiration for my Scrabble style letters on top of the cake.


I wanted them to look vibrant  against my white-washed background so I put a layer of Glossy Accents onto them. 


My stars had Alcohol inks dripped on to them. Distress Glitter was added to the perimeter of my cake.


My flower was made from the Sizzix Bigz Tattered Floral die and seed pearls added to the centre. My metal leaves I added a touch of Gilding wax to.


The Happy Birthday banner is a Cheery Lynn die. I added Tim's wishbone.


The base is a Cheery Lynn doily die which I shaded at the edges to mount my finished cake on to.


Once my letters were glued in place I glued my base to the top of my cake and added my final embellishments.

I hope you have enjoyed my post and would love if you have time to leave me a comment.

Julie xx

Shop at Cheery Lynn for :


Shop at Country View Crafts for all Tim products.

LinkWithin

Related Posts Plugin for WordPress, Blogger...
01 09 10