Translator

Showing posts with label Alpine Flourish Doily. Show all posts

Wednesday, 24 May 2017

Making me Smile


Hi everyone, today I am sharing some more inspiration for my DT post with Cherish The Memory, using their exquisite Vintage Line, how  I adore these pretty papers and 3D Decoupage in this line, my card measures approx 6 inches square.


I started by matting and layering my first 2 layers which had been tattered at the edges and some distressed machine stitching added.


My middle layers were matted and layered with touches of cheesecloth using diecuts from my book adding my sentiment and hearts with Silicone Glue finishing with a shabby ribbon and a flower brad to the centre.


My green diecut framed image was also out of my book of die cuts. I layered it onto my Cheery Lynn die adding my butterflies which I curled their wings to give added dimension adding some black gems into their centres and a little black thread for their antennas. My flowers were die cut using a Spellbinders die and my same pink background paper adding Pearls to the centres.

Products Used: 

Please check out Cherish The Memory Etsy Shop to see their beautiful range of papers and craft packs with new items being added weekly. You can also follow them on the following links :

Happy Crafting, 

Julie x

Friday, 13 January 2017

A Birthday Recipe


Hi everyone,  today for my DT card at Cheery Lynn Designs I'm sharing some Birthday inspiration with you in a vintage style.


I have added some pearls and cheesecloth to my stars and Sister word with a drop shadow effect.


My sentiment was stamped and a little Stickles added to the edges mounting onto my die cut layers with foam strips and another touch of cheesecloth.


My flowers were cut out in white cardstock inking the centres with a soft pink shade and  moulding on my embossing mat to shape the petals and finishing with a pearl centre.

Crafty Hugs,
Julie x

Saturday, 5 December 2015

Nostalgic Christmas


Hi Everyone, this week the Challenge at Cheery Lynn Designs is Non Traditional Christmas Colours and I thought it would be fun to join in with my DT card this week.


All my die cuts on my card were heat embossed with different powders from Sparkly ones to Glossy ones. My main image I sprinkled a little White Powder for a snowy effect and heat embossed around the edges to frame my image, mounting onto a little Cheesecloth.


My Snowflowers are layered in two different shades and I trimmed the top Die cut layer at the outer points of the Snowflake to give a graduation effect on my Snowflower adding a Gum Drop to the centre.


My Deer were heat embossed with a Glossy Powder and mounted onto a pink shade of cardstock at their bodies, I then trimmed around the outline of my deer.  This made my Deer pop on the design and easy to cut around with having a raised surface.


I tattered the edges with my scissors adding some Distress Ink and Glitter Embossing powder to the edges.

Hope you have a nice weekend and thanks for your continued comments, I hope I am well enough to visit your Blogs shortly.

Julie x

Shop at Cheery Lynn for:
I would Like to enter this in to the following Challenges


Saturday, 22 August 2015

Frosty The Snowman


Hi everyone, this week for my DT card at Cheery Lynn Designs I am sharing with you a vintage styled Christmas card using one of our latest released Snowflake dies which comes in a set of 2.


I started by cutting out my Snowflakes in white cardstock and then sprayed Adhesive on to them and added extra fine Glitter. This way you get a lovely smooth finish that doesn't show any lumps of glue. I cut them in half and added to the corners of my first layer.


My Snowman I added Snowtex on to his body and an accent on to his hat and whilst still wet I poured some extra fine glitter over them. The embellishments were coloured with Copics and a little Distress ink at the edges for definition to the Snowman's body.


My Snowflower was glittered in the same way, layering twice and adding a Gumdrop. My Pine Branches were coloured with  Copics and Glitter added for an extra frosty look. 


Merry Christmas was heat embossed with Red Tinsel Embossing Powder.

Thanks for stopping by today.

Julie x

Shop at Cheery Lynn for:

Saturday, 28 March 2015

Tea Party


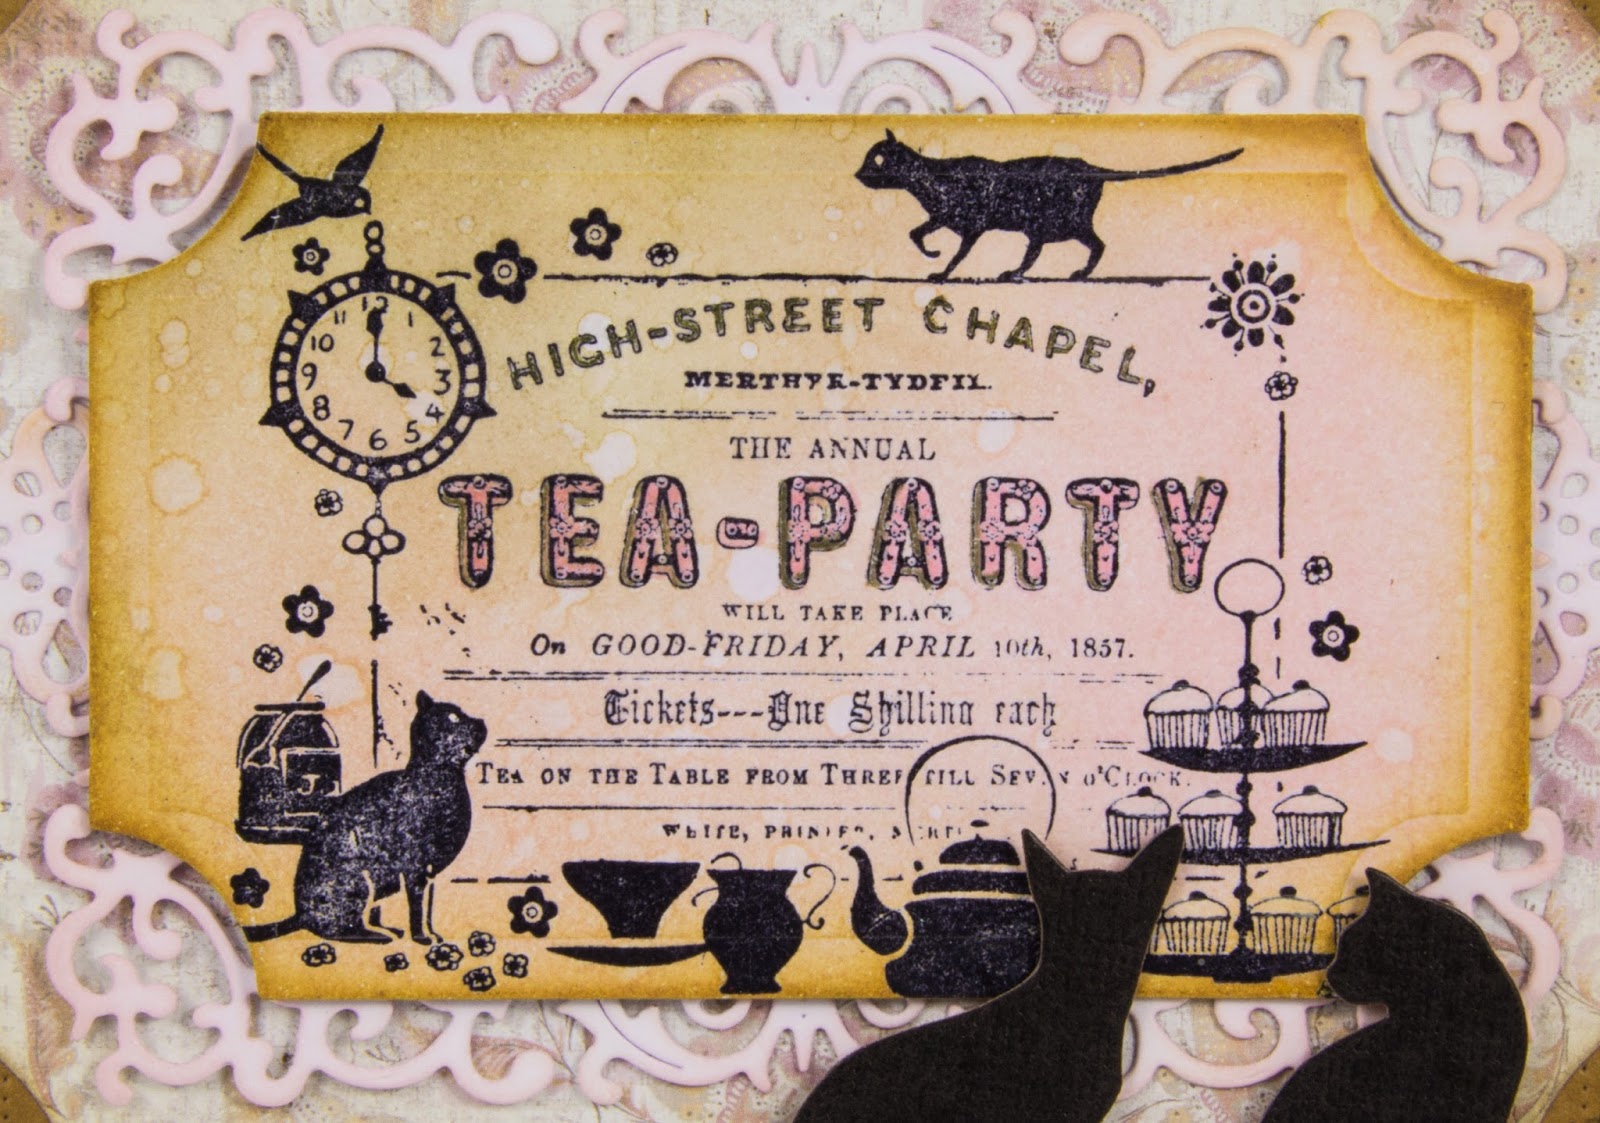
Hi Everyone, thank you for all your lovely comments last week for my Daffodil tutorial they were all very much appreciated. When I was a little girl I loved having Tea Parties with my pet cat - Lucky, who would sit quite happily watching me. This inspired me to make this card for my Cheery Lynn Designs DT post this week which I am sharing with you all today.


Notice how I have mounted my corner die cuts behind my card layer to give a different look and softened the edges of my paper with Ink for a Vintage look.


My layers now together mounted onto my card which measures roughly 6.5 x 5.


My centre image was stamped in Black Archival ink and heat embossed with clear ink. I added Distress ink to age and shade my paper, placing onto the Alpine Flourish Doily with a little Silicone Glue to raise my topper slightly.


My cute little cats were also placed on with Silicone Glue. Aren't they adorable !

Thanks for stopping by today to see my post and I will see you all next week.


Julie xx

Shop at Cheery Lynn for:
I Wish To Enter This In To - 

Crafty Individuals March Challenge - The Animal World. 

Saturday, 31 January 2015

Shabby Butterflies


Hi Crafty Friends, I seem to have fallen behind catching up with your blogs but I have been under the weather with a kidney infection recently and hope to catch up soon. My Cheery Lynn Designs DT project this week that I'm sharing with you is a Shabby Style card with some mixed media on it. It is approximately 5 3/4 inches square in size.


Here is the start of the layers on my card. I cut a square of patterned paper and then placed my Dutch Daisy Border die on with some low tack tape to cut. I used my Distress Tool around the edges and added a couple of scraps of paper which I inked at the edges.

I then applied some Texture Paste through a strip of Sequin Waste to act as a Stencil. Once dry I added a little Distress ink to coordinate with the paper.


I used the large and medium die in the Sentiment Tag set, cutting white cardstock and adding a little Distress ink to the larger die before layering up and adding some Stickles around the middle. I then layered onto my Alpine Flourish.


My Butterflies were cut in patterned paper and layered up twice.

Hope you have enjoyed looking at my card and now feel inspired to try this style of card. 

Thanks for stopping by and I hope you have a creative weekend,


Julie x

Shop at Cheery Lynn for :


Saturday, 8 November 2014

Ornate Wedding Card

Click to Enlarge

Hi Everyone, sorry I am behind catching up with your blogs this week, but haven't been too well. Thank goodness Chris does my photography and posting of my blog.

This week's Cheery Lynn Designs DT card I am showcasing the wonderfully romantic 'I do' die. This die has so much versatility for use on Wedding / Anniversary and Prom cards, but equally beautiful on a Scrapbook page or Gift Box.

Having worked with the new Alpine Flourish Doily on a few cards recently, I thought it would make a beautiful ornate window frame and compliment the happy couple. I love the result and hope you do too.


Let me talk you through how I made this. I layered 2 shades of grey card onto my 8x8 ready cut scalloped card, stamping a flourish stamp over the card for a little detail to the plain cardstock adding Stickles around the perimeter.


I made my flowers, mixing and matching the Tiny Flower Kit, adding stickles into the centres. My leaves and little flourishes on the Bride's bouquet and window box are pieced from the same die used in the corner of my card.


My window I layered a piece of grey card and lace behind it, adding on my window box and layering onto my Doily. Some of you will recognise the window part of the die as it normally is decorated with the Shutters at either side.


My Groom I edged with a little Iced Spruce Distress ink to highlight the edges. My Bride, I did the same using Tattered Rose, giving her a diamanté necklace, bouquet and veil. The veil was gathered with a little stitching at the top and her floral crown was made using a little strip of paper covered in flower soft. I mounted the couple onto my card using foam pads and a little silicone glue to hold her veil at the back. The veil, I secured on the front with small dots of glue which were then covered by Flower Soft to disguise.


Hope you all have a crafty weekend and I look forward  to catching up with your blogs soon as I'm up to it.

Julie x


Shop at Cheery Lynn for :


Saturday, 25 October 2014

Ornate Vintage Card


Click to Enlarge

Hi Everyone, hope you are all having a lovely weekend.

For my Cheery Lynn DT card this week I decided to showcase the versatility of one of my latest favourite dies from the newly released Cheery Lynn Designs Doily Collection called Alpine Flourish Doily. 

This die comes as a set of 2. You have the option to have a solid centre or use the ornate centre in the middle of your doily. For my card this time, I opted to have the solid centre as I wanted to stamp and mount a verse to place on it using the card maker die, this also fits perfectly as a mount to the back of my Alpine Flourish.


You will notice the ornate sides on my card are die cut using the centrepiece from my doily. I then mounted onto my plain card stock to make my design pop forward.


My flower and leaves were shaded with distress inks and mounted onto the Italian Flourish Mini Doily. I die cut out 2 doilies and made a cut into the centre on both of them. Next folding back and forward in a concertina style, I glued them together at the edges to form the full circle again.

I added a little stickles and distress around the edge and pearls to finish.

Cheery Lynn New Release:


Other Cheery Lynn Dies Used :


Thanks for stopping by to see my card today. 

Julie x


LinkWithin

Related Posts Plugin for WordPress, Blogger...
01 09 10