Translator

Saturday 26 December 2015

Winters Day


Hi Everyone, hope you all have had a lovely Christmas Day and Santa left you some new Craft Goodies. In Scotland it is unusually very mild for this time of year and no signs of snow yet, so I decided for my DT card at Cheery Lynn Designs to make a Wintry Scene onto my card.

I started with a greyish blue cardstock and scattered some chunky white Embossing Powder on it to give a snowy effect. Next, I tattered and shaded the edges with Distress ink. 
My Tree and Icicles I applied the same technique as I did on my Wall Hanging last week which you can see again HERE.


My Winter Sign I die cut out in black cardstock and fussy cut a layer in white cardstock distressing around the edges and gluing onto my sign, adding the word Winter and some more white embossing powder.


Finishing off my card with accents of Flower Soft snow.

Thanks for stopping by today and for all the lovely comments left on my previous post, I was overwhelmed by them. The sleigh is now proudly displayed on my Parent's mantlepiece for Christmas.

Crafty Hugs, 

Julie x


Shop at Cheery Lynn for:


Sunday 20 December 2015

Jingle All The Way


Hi Everyone, Apologies for still being behind with some of your blogs, I am still under the weather and we are also having terrible problems with our internet downloading pages and losing connection, hopefully all will be sorted soon. 

This is our last Challenge of the year at That Craft Place and I am super excited to showcase some of Lisa's amazing Bespoke MDF for my DT project. All links on my sidebar.

It has been a few years since I have made an extra special project for my much loved parents so this is a Christmas Present that has had hours of love poured into every detail for them.

With everyone so busy at this time of year I thought I 
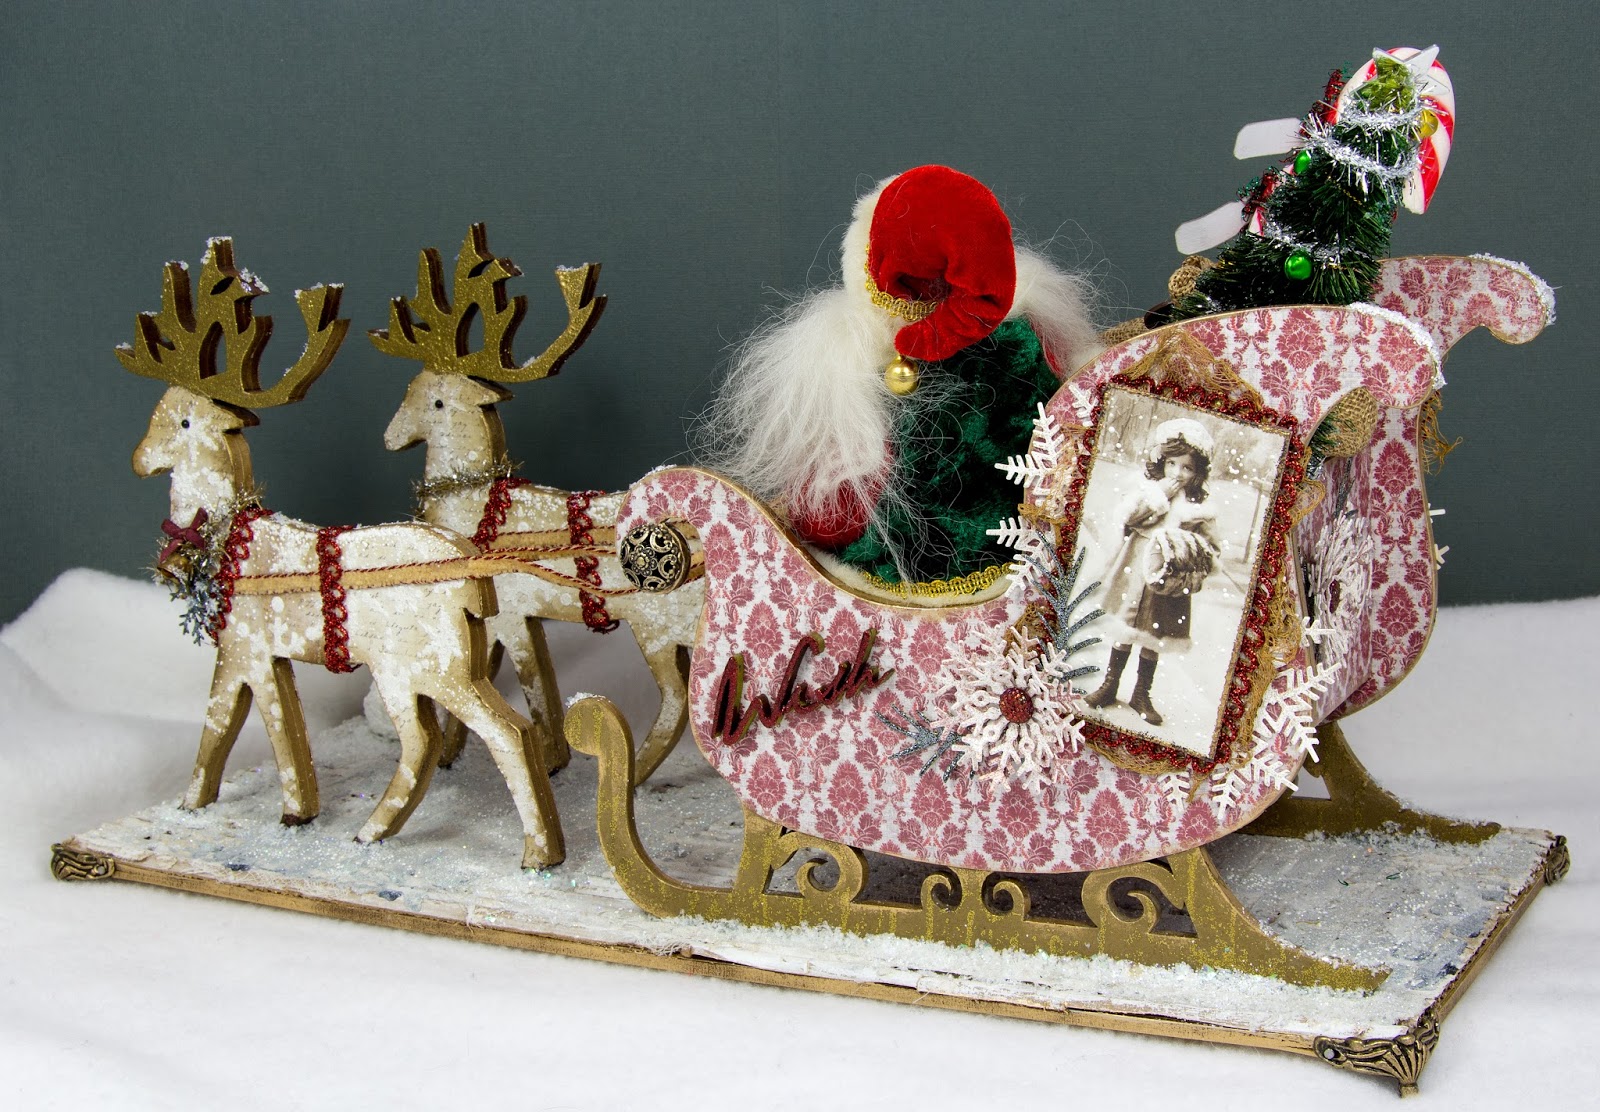
would just show you around my Christmas Scene, which my Husband has taken all these amazing pictures for me.


As you can see I painted the runners of my sleigh, then stamped and heat embossed Gold onto them for added texture and went around the perimeter rubbing in Gilding Wax.


Next my papers were glued in place sanding around the edges to make neat. I then gave it all a coat with DecoArt Gloss Varnish.


A view inside my sleigh. 


For my images I added Chunky white embossing powder, I then mounted the images onto cereal box packaging and dipped into my embossing powder to form a frame.


Some cheesecloth coloured and dried with my heat gun, this makes it lovely and stiff and I added it behind my images.


A view of one of the finished sides.


I glued two Reindeer together for added stability.


My MDF words and die cuts were all heat embossed with different colours of glitter embossing powders.


My Tree was from Tim Holtz and I sprayed it with Distress Sprays, once dry I added Glossy Accents and Distress Glitter. Finishing off with a star, tinsel and bells threaded together.


My Santa Sack was stitched to form a sack adding Polystyrene packing peanuts to the inside. A ribbon and embellishments to the outside and a couple of labelled Candy Canes for my Mum and Dad.


I tore corrugated cardboard back in areas to reveal the corrugation and gave a coat of gesso and added on some Cheesecloth and glued onto my plinth of wood. I wanted this to look like a very old Cobbled Street.


Next was to add my cobbles using a brick stencil along with DecoArt Sand Texture Paste that I added a little black paint too. I scattered over glitter and chunky white embossing powder. Once dry heat set in place.


Finally lots of Flower Soft Snow was added. Gilding wax was added to the feet and around the edges of the plinth.


My Snowman was originally a cheap wooden Snowman tree decoration. I covered his body in Snowtex and added a Paper Clay Carrot for his nose, along with a stamped sign.


Santa was made by using .... Ha Ha fooled you ..... bought from a Christmas shop !


The reverse side of the sleigh.


The rear of my sleigh.


Some angled shots.


The reindeer's collars.

If there is anything else you would like to know about my post please email me or leave a comment and I'll get back to you when I can.

Wishing everyone a Wonderful Christmas.

Crafty Hugs,

Julie x


Products used:
MDF Sleigh
MDF Words
Bespoke Cutting Service used for Reindeer and Plinth.
DecoArt Products:
Embossing Powders
Distress Products
Hessian
Cheery Lynn Dies:
B635 Snowflake Set 2
B486 Dancing Snow Flurries
B475 Merry Christmas Hanger
DL175 Lace Pine Snowflake
B156 Pine Branches
B216 Wreath Strip

All Products available from That Craft Place.

Saturday 19 December 2015

Christmas Morning


Hello to everyone, this week for my DT post at Cheery Lynn Designs I have made a mixed media wall hanging with my inspiration coming from thinking Santa has delivered all his Presents and is now relaxing whilst his washing dries. You may want to grab a cuppa while I take you through all the techniques and photos.


Starting off with a piece of corrugated card I ripped back the paper to reveal the corrugation in parts. Next I applied a layer of Gesso with a baby wipe and some Crackle Paint to the edges. Once dry I rubbed over some Distress ink to highlight the cracks. I then scattered embossing powders over my Cardboard in lots of frosty colours and sparkles, to give the effect of a snowy scene and depth within a Forest from the corrugation. I just wish that cameras could pick up all the glitter and sparkle.


Now to the fun part with my dies. I cut out my birch tree 4 times, inking down one side of the birch tree with Distress ink. On the other side I shaded with a Versamarker Pen and applied some White Embossing Powder. You will now see the difference between the inked tree to the one with added snow.


Building them up I wanted my trees to look slightly different on each side so I now layered extra branches behind the main tree, notice the difference between the 2 trees.


The Icicles had Glitter Embossing Powder added in a frosty shade with a little ink added to the drips, finally adding some Glossy Accents, this gives the look of the ice melting.


My little Wildlife animals were all shaded with Distress Ink and Black Liquid Pearls added into the centre of their eyes. I also highlighted the tiny details that Cheery Lynn are fab at putting into their dies, with a Fine Liner Pen.


Santa's Laundry - First I coloured the areas I wanted red with a Copic Pen. Next I rubbed over my die cut with my Anti Static bag and then I used my Versamarker Pen over the red and applied a Red Sparkle Embossing Powder to make Santa's clothes glisten. I repeated the process on the white areas of the jacket using a White Puff Embossing powder. His underwear was shaded with Distress Inks and once again I highlighted all the details with a Black Fineliner Pen. The washing line was coloured with Copics.


My Christmas Lights once again were heat embossed with different colours. Once built up I added a fine black line between the baubles and wiring, this gives an illusion of depth.


Finishing off with my Happy Christmas Sign and Holly which has all been heat embossed with different shades.


A final tip before I finish ... Should you not have a large range of colours of Embossing Powders in your stash, colour your die cut with Copics and add Clear Detail Powder or Sparkly Clear Powder. This is how I got the effect on my grass using Copics.

Thanks everyone for your continued comments and I hope you feel inspired to try some Mixed Media with your dies. 

Crafty Hugs, 

Julie x
Shop at Cheery Lynn for:

Wednesday 16 December 2015

Vintage Dress Form


Hi Everyone, today for my DT post with Craft Consortium I am sharing with you another of their New Release Decoupage Papers, this one is called Vintage Butterfly.


I started off with a Paper Mâché Dress Form and gave it a coat of Gesso. Next I tore my Decoupage paper into sections measuring about and inch and a half and layered on with Mod Podge.


Next stage was giving it a layer of Decoart Crackle Glaze and once dry I rubbed in some Antiquing Cream to highlight my crackles and adding a coat of Gloss Varnish to seal.


Adding on some fringing you would normally see on the edges of furniture or cushions and equally as effective for my Dress Form. Also placing on some swirling Black gems for extra detail.


For a quirky touch I fussy cut out a Butterfly from the Flutter of Butterflies Decoupage papers and added a few gems.


My Necklace was made from bits in my Craft Stash.


My stand also was given a crackle effect to compliment the Dress Form, finishing off with a layer of Gloss Varnish and adding a little bow and Heart.


A rear view of my Dress Form. 

Please check out the full range of papers from Craft Consortium HERE,  and you will see all the New Range papers by clicking HERE. Please also take a look on Facebook at Craft Consortium as they have 3 packs of Decoupage Papers to giveaway to a lucky winner.

Thanks again for your visit today, I really do appreciate it.

Julie x

Sunday 13 December 2015

Secret Santa at A Vintage Journey


Hi there, what an exciting day for us all at A Vintage Journey. A few months ago Brenda put all our names into a hat and revealed secretly to us all who we would be making a gift for. I was told that Jenny from Pushing the Right Buttons was to receive my gift. I was so excited about getting Jenny, having met this lovely lady back in August at Wendy Vecchi's workshop made my Secret Santa gift feel extra special to make.

I decided a Tree Decoration would be a lovely keepsake gift that could be taken out each year and remind Jenny of Secret Santa at AVJ.


My daughter had brought me several little Birdhouses home from Michaels in America, sadly this was my last one but I'm sure she will be making a trip again with her work soon to get me some more. I started by giving it a coat of paint and Weathered Wood. Next adding a thick Layer of white Crackle paint.


Sorry I don't have any more ongoing photos as I got so excited with the Crackles Lol. Let me just show you on my photos.


Next I added a thick layer of paste around the base of my house and onto areas where I wanted it too look like snow had fallen onto mossy areas. I then dripped 2 shades of Green Alcohol Inks onto these areas along with some chunky white embossing powder along with a finer white and sparkly ones and let it completely dry.


Once dry I heat set the powders, they expanded and gave a super snowy effect.


My roof is sheets of Bark available from That Craft Place (links on sidebar) which I glued in layers onto my roof.

I sealed my crackle effect with Deco Art Matt Varnish and sprinkled on some Glamour Dust for a Glistening effect whilst still wet. Next I start to sprinkle on several layers of different snowy embossing powders from Frantage and Wow powders.


Next I added Deco Art Glistening Snow Writer to form icicles around my house adding on extra sparkle from Glamour Dust.


My Icicles on the roof were die cut and Heat Embossed with Wow powders. More heat embossed snow on the roof.


My cute little Robin was shaded with Distress Inks and Black Liquid Pearls adding onto his eye. My little date sign was made from a Coffee Stirrer. I used a crackle effect and added some Red Glistening embossing powder to the edges to frame it. My date was added from Tim's Transfer Sheets.


Around the back you will see all the effects applied again and a Transfer from Tims Sheets.

My Secret Santa was Alison from Words and PicturesI was lucky to meet this wonderful lady at Andy Skinner's workshop in November so was really pleased to learn my gift was from her. She has made me this amazing nostalgic 3D Christmas scene, I love Dolls Houses so this was the perfect gift for me. I absolutely adore all the incredible details and when the light is switched on at night as its sits on my Fireplace Hearth it looks glorious.


And if that wasn't enough she also sent me some bags filled with embellishments for my stash which I have shown a few and the super Festive Tag. Thanks so much Alison, I feel honoured to have a Crafty Keepsake from you.


Please stop by Alison's BLOG to see more photographs and details of my gift.

I can't wait to hear what Jenny thinks of her gift from me and see what the other Creative Guides have made. Please pop over HERE to see the reveal.

LinkWithin

Related Posts Plugin for WordPress, Blogger...
01 09 10