Translator

Wednesday 30 September 2015

Gypsy Elegance


Hi Everyone, thanks for all your lovely comments on my Spooky House, it was fab reading them all. Today I am sharing with you a DT card for Craft Consortium using their Gypsy Gypsy Paper pad.


My centre mat is one of the fab toppers you get in the Gypsy Gypsy pad, I stamped my lady on to this with Archival Ink and shaded with Distress Pens and a Watercolour brush. The papers took this technique so well and didn't blister or bubble in anyway.


My small wooden butterfly I added Distress Crackle Paint to and a handmade flower was added also using the Gypsy Gypsy paper pad.

Craft Consortium have another fab free giveaway on their Facebook page of Decoupage Papers, please pop over by putting their name into you FB search where you will find all the details.

Hope you enjoyed my post and thanks for stopping by today.

Julie x

Product Used :

Cheery Lynn Dies-


Sunday 27 September 2015

31 Creepers Court


Hi Everyone, over at That Craft Place we start a new Challenge for the next fortnight which is Mixed Media Anything Goes. I couldn't resist making a Halloween House for my DT post.


My house before I started working on it.


And finished.........Chris my Darling HB has taken many fabulous photographs for me, giving it a super spooky feeling, so I thought it would be nice to just let you see lots of fab photos on this post and if you want to know anything please just ask me.


Visit if you dare !
                                                            
Nice Cat !

Do you do Bed & Breakfast ?

Things that go bump in the night !


Beware of the spiders !

This is my territory !

I seem to have lost my skin !

Trick or Treat !


My skeletons, Cheery Lynn dies and DecoArt products are all available at That Craft Place. Links can all be found on my sidebar on the RHS.

Thanks for stopping by today and please check out HERE what my fabulous teamies have been up to.

Julie x

I would like to enter this into the following challenges :


Saturday 26 September 2015

Make a Wish


Hi Everyone, thanks so much for all your lovely comments on my Halloween card and my Bird card last week, it was lovely to read them. This week I was inspired by the image of this little Sailor boy to make a nautical themed card for my DT post at Cheery Lynn Designs.


My Lighthouse was cut out twice in blue Cardstock and once in white. I layered the White cardstock on to the blue, slightly offsetting for a shadow effect and distressed with ink at the edges. Next I fussy cut my blue stripes out and glued in place. I coloured the roof on the house with a brown Copic pen.
My Anchor was coloured with a brown and gold pen and a little Distress powder added for a rust effect.


I love the different designs you can get from the Lady Kate Edger and you can move it right along whatever your length of paper matching up as you go.


Finishing off my card with some Pearls.

Thanks for stopping by.

Julie x

Shop at Cheery Lynn for:
Patterned Cardstock is from Craft Consortium - Bloom Beautiful Range.

Monday 21 September 2015

Hello Friend


Hi there fellow bloggers, I hope you all had a lovely weekend. Today I am sharing with you a card made with the most amazing 12x12 paper pad called Bloom Beautiful from Craft Consortium. When I first saw this pad I just ooh'd and ahh'd at every sheet and I am continuing to drool over this paper pad every time I open it. Please check it out HERE.


I started off by die cutting my Birdcage in Chipboard and adding some DecoArt Crackle paint. Whilst still wet I sprinkled a little Distress powder in Milled Lavender and dried it with my heat gun so the paint would bubble a bit more for texture. Finishing off with a little gilding wax and fussy cut birds from the paper pad.


I sprayed my paper with a little water on the reverse side and gathered in to look like a curtain, drying in place with my heatgun. I added 2 rows of stitching, a handmade Rose along with a stamped sentiment and a ribbon to finish.

Thanks for stopping by today.

Julie x

Paper Used:

Cheery Lynn Dies used :

Saturday 19 September 2015

Who Ate The Spider !


Hi Everyone, I am having so much fun with the Halloween Dies from Cheery Lynn Designs, creating little scenes on my cards that I just had to share another one with you for my DT project this week.


My background was created with Hickory Smoke and Stormy Sky and a Spiders Web Stencil.


My Washing Line and Moon were cut out in White Cardstock and coloured with Copics adding a little bling on to the Witches shoes.


My Tombstone was also cut out in White Cardstock and shaded with Distress inks. My Barbed Wire was heat embossed with Silver Embossing Powder and a little Rust Coloured Stazon ink added to it.


As you can see my very naughty Horrible Cat ate the Spider off the web ! I cut my cat out in Black Cardstock and trimmed his head and front legs off. I then glued the body part in to a sitting position and placed a little Silicone Glue on to the back of his head and re positioned it for added dimension. My Spider I trimmed his legs down a little bit in an uneven way so they had a chewed look to them.

Thanks for stopping by today.

Julie x

Shop at Cheery Lynn for : 


Saturday 12 September 2015

Merry Christmas my Reindeer


Hi Everyone, today I am sharing with you my Cheery Lynn Designs DT card which is a Festive card made with some of their New Release dies.


My large Snowflake die was cut out in White Cardstock. I sprayed with glue and added some extra fine glitter on it. You will also notice that on my Pierced Stacker die cut the little pierced holes act as a super guide line for adding Stickles evenly - Unfortunately the camera hasn't picked up the sparkle too well. 


My cute Reindeer was cut out in Kraft Cardstock adding a layer of White Cardstock to the back I shaded the areas with Red and Gold pens, adding a little ribbon to the neck and Stickles to the nose.


My Poinsettias were cut out in Patterned Cardstock, distressing lightly with ink and adding a few stamens.

Thanks for stopping by today and have a lovely weekend. 

Julie x

Shop at Cheery Lynn for:


Thursday 10 September 2015

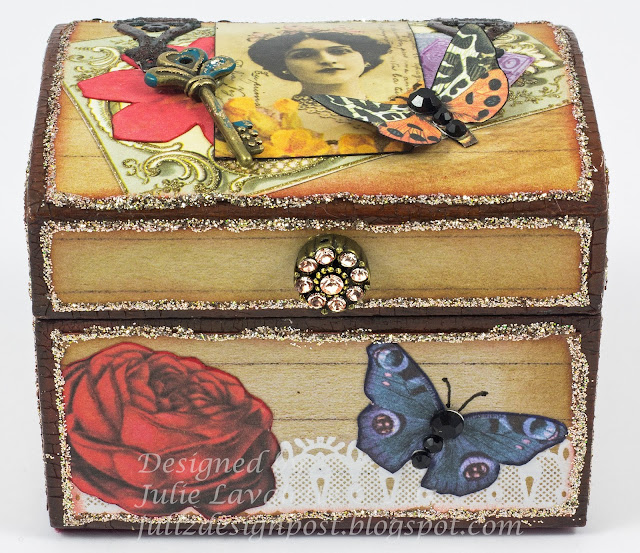
Gypsy Gypsy Travel Chest


Hi, my fellow bloggers, lovely to have you stop by to see my latest post and thank you so much to everyone who left a comment on my last post, here on my blog and on Facebook, it made my day.


Today I am sharing with you a small Balsa Wood chest box measuring approx 3 x 2 x 2 inches that I altered using Craft Consortium's paper pad - Gypsy Gypsy and some of their In House Creations Decoupage Papers.


I started off by adding some Archival Ink around all the edges to make it look a Mahogany colour, next layering on a coat of Deco Art Crackle Glaze.


My papers were trimmed to size with a little Distress Ink added to the edges. Now in your Gypsy Gypsy Pad there are the most beautiful Lacey Transfers of all widths, I rubbed one onto the papers before gluing on my box.


I fussy cut the Rose and Butterfly adding a few black gems and Platinum Stickles around the edges. My chests opening catch is a bead from a broken bracelet.


On the top of my Trunk I cut out Cheery Lynn Hinges and applied Andy Skinners rust technique to age them. I fussy cut out this beautiful image from the pad edging with a Black pen and adding accents of paper from my Gypsy Gypsy Pad along with a little key, finally adding some more Stickles and a little Felt onto my underneath base.


Please do check out all the wonderful papers from Craft Consortium and like their FB page - Craft Consortium Ltd, where you have a chance of winning many fabulous giveaways.


Julie x

Monday 7 September 2015

My Craft Journey continues with some exciting news.


Hi Everyone, Thanks so much for stopping by today, it means a lot for me to be able to share my exciting news with you.

I was recently contacted 'out of the blue' by a Papercraft company called Craft Consortium who launched on to the UK market in February this year. They make the most exquisite 12x12 paper pads in superb quality in a beautiful selection of 40 double sided papers in each pad, which include pearlescent, foiled, spot varnishing and very elegant finishes. They also stock fantastic Decoupage papers in a superior quality and many match their paper pads, which is a great addition for all of us who like to do Mixed Media.


Anyway I was ecstatic to be asked to design for this company, to showcase their amazing products. My craft projects will also be on display at a prestigious exhibition in Frankfurt called Creative World January 2016 and over the coming months I will be making cards, 3D projects and home decor showcasing how versatile their papers all are.

My card today is made using the Gypsy Gypsy paper pad which has a wonderful mix of eclectic,vintage and shabby chic influences with touches of elegance. Please check out the full paper pad HERE.


The main image was cut out from the pad and tattered at the edges with some lace and a few staples added.


On the Gypsy Gypsy pad I found myself gathering lots of inspiration from the paper designs. This is what influenced me in adding doilies and die cut keys.


My stamps, butterflies and postcards are all fussy cut from the Gypsy Gypsy pad.

For all you Facebook followers please put into FB search engine - Craft Consortium Ltd and Like their page. This way you won't miss out on their regular giveaways.

Thanks again for stopping by, hope you have a wonderful week creating. 

Julie x


Saturday 5 September 2015

Halloween Fun


Hi Everyone, Halloween is fast approaching so I thought for my DT post at Cheery Lynn Designs this week it would be nice to share some inspiration with you all.


I decided to make my own inky background. You will notice from the photograph I taped my die cut in place along with the die, applying my Distress Inks and a Web Stencil for depth.


I then went around the perimeter with a Black Fine Liner Pen before lifting my die cut off. This helps to frame your inky detail.


My web I added some ink along with some Rock Candy Distress Stickles, double layering Happy Halloween for a Shadow Effect.


My tree was cut out in White Cardstock, inking the edges and adding Distress Stickles to the Black Cardstock for an eerie glistening effect, off setting my tree I glued in place.

Thanks for stopping by my blog today and I will be back on Monday with some exciting news to share with you.

Julie x

Shop at Cheery Lynn for :


Friday 4 September 2015

Home Sweet Home - A Vintage Journey


Hi fellow bloggers, thanks so much for stopping by today to see my DT post for A Vintage Journey. Jennie is hosting this months challenge called Home Sweet Home and we have to incorporate in to our design what sums up home for us all. I love having vintage touches around my home so I decided to make a wall hanging for my bedroom, incorporating a lot of my favourite things.


I started off with an MDF Ornate Frame which measures 11'' x 8'' that my daughter purchased for me in America  applying paint with Cut n Dry Foam.


Stamping Andy Skinner's Industrial Stamp set.


Next adding some gilding flakes to some areas.


Finally adding a thick layer of Crackle Glaze and rubbing over some Distress ink when dry to highlight the cracks.


Onto some Grey board I stencilled some Crackle paste and added a little paint to the background and a little Black Distress Paint paint to the perimeter.


My paper I had to join as it was a 6x6 pad but I wasn't concerned about the join as I new it would be hidden when finished. I gathered my paper and highlighted with Distress ink, tattered the edges and added stitching and lace for detail. Also adding little pieces of lace ribbon which I had coloured with Milled Lavender Distress Paint. I glued my paper in place with a little Cheesecloth added into areas.


I glued my image on to an MDF Oval rubbing back the edges of my print with a baby wipe. I highlighted her necklace with some gems and her hairpiece with a couple of buttons and gems.


I love Cherubs and have a few around my house so I wanted to add one into my design. On my resin cherub I added a little paint to his sheet and a layer of crackle glaze and once dry a little Distress ink was rubbed over. My metal leaves had a little gilding wax added to them.

Finally finishing off with lots of pearls.

Please hop over HERE to see all the amazing projects from my Teamies. This challenge runs for a month so hopefully you will get some time to join in to have a chance of winning a £20 voucher to spend at Country View Crafts.

Julie x

LinkWithin

Related Posts Plugin for WordPress, Blogger...
01 09 10