Translator

Showing posts with label Gypsy Gypsy. Show all posts

Friday, 8 February 2019

Happiness Your Way - Craft Consortium


Hi fellow bloggers and thanks for stopping by. Craft Consortium have launched a new range of paper pads called Essential Pads and they certainly are when you see them. I have been playing with two of these pads called Wood Textures and Vintage Emporium which are amazing.


My card today uses the Vintage Emporium Pad with all these lovely vintage postcards, stamps and photographs in it. I layered up in a collage fashion with touches of lace and fussy cut butterflies from Gypsy Gypsy Paper Pad.


I added a stamped sentiments, lots of bling around my frame and Distress Ink around my vintage photo from the paper pad.

Do check out all of Craft Consortium’s fabulous new pads HERE and check out them on Facebook and Instagram for regular inspiration and giveaways.

Craft Consortium Products Used:
Vintage Emporium Essentials Paper Pad

Crafty Hugs, 
Julie x

Monday, 5 March 2018

Happy Mothers Day Card


Hi everyone, today I am sharing a Mother’s Day Card using the eclectic Gypsy Gypsy paper pad from Craft Consortium for my DT post. This pad has a wonderful mix of patterned papers and toppers, with metallic, pearlescent and embossed textures and finishes to name a few.


My card uses a few papers from the pad, tattering layers and fussy cutting lots of elements.


Adding lots of rhinestone gems and some lace for an extra vintage feel.


My sentiments are both stamped, adding my Cheery Lynn film die and fussy cutting my banner.


Craft Consortium Products Used-

Cheery Lynn Dies Used- 


Thanks for stopping by today and do check out Craft Consortium and follow them on Facebook and Instagram for regular inspiration and giveaways.

Crafty Hugs, 
Julie x

Wednesday, 30 August 2017

Mixed Media Letter Rack


Hi everyone, thanks for stopping by today to see my DT post for Craft Consortium using a selection of their products to decorate my MDF letter rack which I won a couple of years ago in a crafty competition. I have had this sitting in my stash for sometime but after tidying my Craft Room I decided it was time to alter it.


I started by giving it a coat of Gesso, this helps give the MDF a seal and helps keep the vibrancy in the Decoupage Paper. Next I added a layer of Mod Podge and pressed a full section of my paper onto the letter rack. 


Once dry I trimmed at the edges roughly with scissors and then rubbed at the edges with a sanding block for a neat edge. I repeated the process on all the sides.


I went around the edges with a coordinating Acrylic paint and once dry I added some Gilding Wax to give an aged look.


Using papers from the Gypsy Gypsy pad I fussy cut out all my elements. My postcards and stamps were tattered at the edges adding accents of lace, staples and a Die Cut Doily from Cheery Lynn for extra detail. 


My Rose was shaped in my hands to give a bevelled edge and glued in place with Silicone Glue.


Finishing with beautiful butterflies fussy cut from the pad and pretty embellishments for an eclectic feel to compliment the paper.


Craft Consortium Products Used :


Thanks so much for all your lovely comments and please do check out Craft Consortium and follow them on Facebook and Instagram for regular inspiration and giveaways.

Craft Hugs, 

Julie x

Tuesday, 12 January 2016

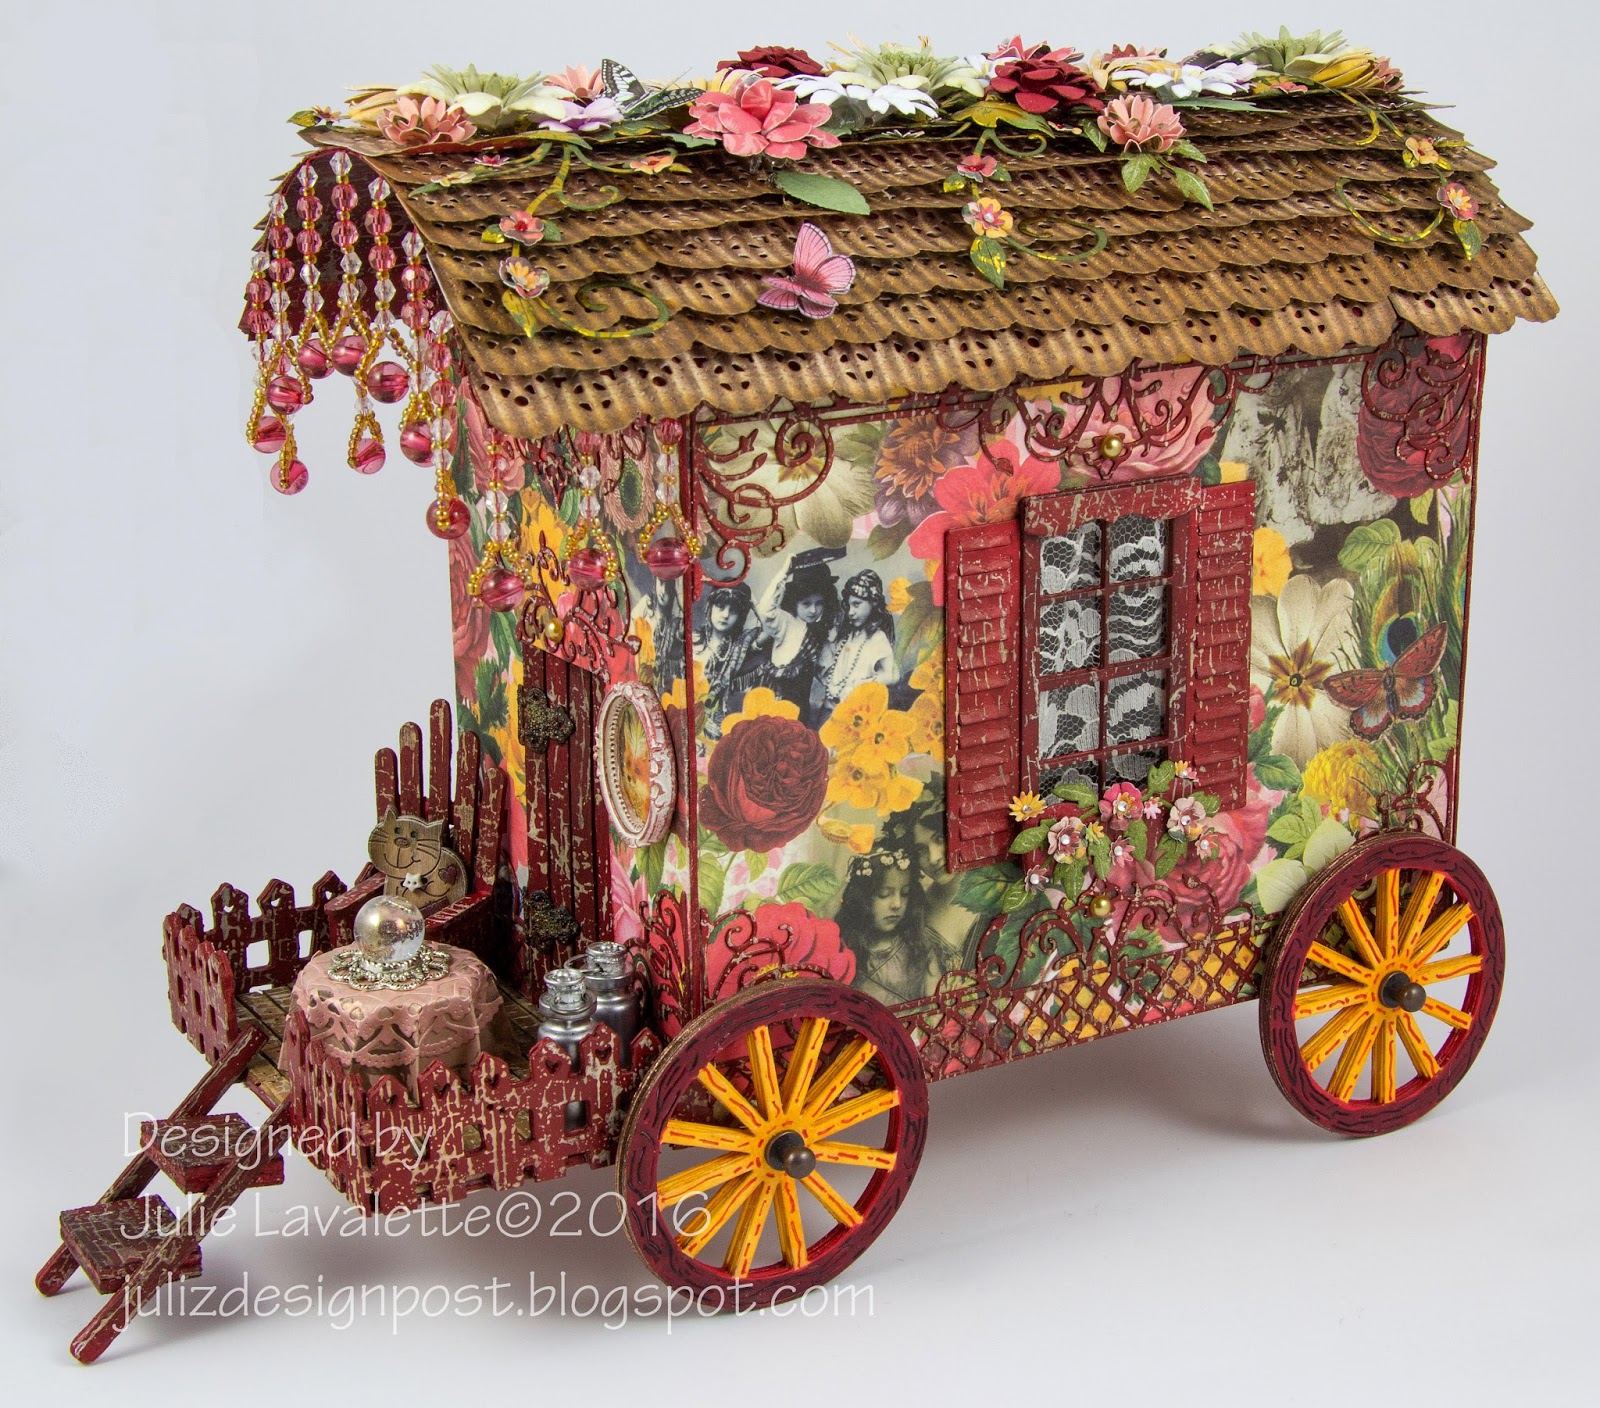
Gypsy Gypsy Caravan


Hi Everyone, Today I am super excited to finally be able to show you my Gypsy Caravan I made for my DT post with Craft Consortium using their gorgeous Gypsy Gypsy Paper Pad....very apt don't you think !

My Gypsy Wagon will be going off on its travels to Frankfurt to a large Trade Show at the end of January, isn't that exciting !  So I needed to make it sturdy enough to withstand several journeys, so I attached my paper to chipboard to reinforce the walls.


My Wagon Wheels were cut out from a Cereal box several times gluing and weighting them down to dry. I then coloured them with Copic Pens and added some Gilding Wax and a Hitch Fastener to the centres.


My Windows and Flourishes were also cut and layered from a Cereal Box and painted with a complimentary red paint. Using Gesso I stamped on my peeled paint effect with Andy Skinners Industrial stamp set.


Once dry I rubbed over with a Potting Soil Archival Ink to shabby them up.


For my fence and door I used the same effect as on my windows.


My seat, floor and door are all made from Coffee Stirrer sticks. My milk churns are small glass bottles covered in Alcohol Inks with a stud fastener and a metal ring added to them. My tablecloth highlights another paper from this paper pad. My crystal ball is a glass marble sitting on a jewellery finding. My cat is a little button.


My corrugated roof showcases another paper from the pad, I love the look it gives. Craft Consortium also do a matching Corrugated Decoupage paper which I lined over the base of my wagon.


My roof flowers were made using Cheery Lynn flower dies. Some are cut from the Gypsy Gypsy Pad and others shaded with Distress Inks, I tried to copy some of the flower designs on my wagon walls. The butterflies were fussy cut from the paper pad too.

Now I'll just let you enjoy some more close up photographs.


The flooring inside the wagon is a paper sheet from the Gypsy Gypsy pad.


This is the second time I have made a wagon ( See the older one HERE ) and the design is purely out of my head without following any templates, but this time I changed the dimensions slightly and used some different techniques.

Please check out Craft Consortium on Facebook, Pinterest, Twitter and Instagram to keep up with all their new products and fabulous give-aways.

Thanks for stopping by today and would love if you left me a comment,

Crafty Hugs,

Julie x

Products Used:


All dies from Cheery Lynn Designs ( Except Fence ) 

I would like to enter this into the following challenges :

Tuesday Throwdown - # 276 Add Dimension
We Love 2 Create - Anything Creative/Mixed Media Goes Goes
Frilly and Funkie - Holiday Hues Challenge
Creative Artiste - Challenge 10 
Scrap and Craft Inspiration - #17 New Beginnings ( New Home )  
Anything But Cute - Challenge - Ring out the Old bring in the New (Cat Button and Crystal Ball Bought for) 
Dies R Us - Challenge #40 Something New 
Rhedds Creative Spirit - January Challenge ( Coffee Stirrers and Cereal Boxes Used ) 
WLVC Challenge - #61 Anything Goes With Vintage Lace 
Live and Love Crafts - Challenge #43 Something New (Cat Button and Crystal Ball New)  
Emerald Creek Dares - New Challenge (Cat Button and Crystal Ball New)


Thursday, 12 November 2015

A Little Birdie Told Me Birdhouse


Hi Everyone, hope you are all well and enjoying some creative time. Today I am sharing my DT post with Craft Consortium on my blog and on their Facebook Page. Please pop over to Craft Consortium Ltd on FB and 'like' to be kept informed of new products and regular giveaways.

I have had this Balsawood Birdhouse sitting in my Craft Room for a while and when I saw some of the designs in their Decoupage Papers I just couldn't wait to decorate it using them.


I started by giving my house a coat of Gesso to seal it. I then used a stamp and Grey Archival Ink to add a peeled paint effect to the doors, fence and windows. I used a metal clothes fastener for my door handle.


Next was adding my Decoupage papers with some Mod Podge and once dry I added a layer of Crackle Glaze to the walls and highlighted the cracks with an Antiquing cream.


I used papers from my Gypsy Gypsy pad to add my grass, flourishes and flowers to the roof. 


My flowers on the fence were MDF shapes, I added crackle paint and a Pearl to their centre.


A Little Birdie Told Me was stamped onto a coffee stirrer stick and my die cut bird was shaded with Distress ink.


Finally adding a little lace and pearls to finish.

Please note, I have fallen behind at present with catching up with your blogs after life getting in the way and also being at a fantastic workshop weekend with dear blog friends and the super talented Andy Skinner, so please bear with me getting up to date.

Meanwhile if you're not already linked up to me on FB please send me a friends request ( Julie Lavalette ) so I don't miss any of your posts on your blog, as this way is sometimes easier when I'm on catch up.

Julie xx

Craft Consortium Products Used :

Craft Consortium Decoupage Papers:

Cheery Lynn Dies Used:


Wednesday, 28 October 2015

Christmas Gift Set


Hi Everyone, Today I'm sharing some more of Craft Consortium's new Decoupage Papers for my DT post. I remember as my girls were growing up I loved when they would come home with something they had handcrafted at School or a Youth Club. I still have several items in my Memory Box and Christmas Decoration Box which are precious memories of them growing up. This is what inspired me today to make my own Christmas Bauble and gift box using Craft Consortium's new range of Decoupage Papers and their Gypsy Gypsy pad.


I started by giving my Paper Mâché Bauble a coat of Gesso and then added torn pieces of Decoupage Paper to it with Mod Podge.


My Poinsettia Flowers were cut out in vellum , a little Gilding wax added to the edges and Flower Soft in the centres.


My box I made using papers from the Gypsy Gypsy pad and my Scorpal board. I added my bow and tag which had been die cut out in Mirri card.


I assembled my gift into the box using one of the lush metallic Decoupage papers from the range as packaging for a luxurious feel.

Please head over to Craft Consortium on Facebook and like their page. You will then get info of competitions and Giveaways.

Thanks for stopping by today.

Julie x

Craft Consortium Products Used :

Cheery Lynn Dies -

Thursday, 10 September 2015

Gypsy Gypsy Travel Chest


Hi, my fellow bloggers, lovely to have you stop by to see my latest post and thank you so much to everyone who left a comment on my last post, here on my blog and on Facebook, it made my day.


Today I am sharing with you a small Balsa Wood chest box measuring approx 3 x 2 x 2 inches that I altered using Craft Consortium's paper pad - Gypsy Gypsy and some of their In House Creations Decoupage Papers.


I started off by adding some Archival Ink around all the edges to make it look a Mahogany colour, next layering on a coat of Deco Art Crackle Glaze.


My papers were trimmed to size with a little Distress Ink added to the edges. Now in your Gypsy Gypsy Pad there are the most beautiful Lacey Transfers of all widths, I rubbed one onto the papers before gluing on my box.


I fussy cut the Rose and Butterfly adding a few black gems and Platinum Stickles around the edges. My chests opening catch is a bead from a broken bracelet.


On the top of my Trunk I cut out Cheery Lynn Hinges and applied Andy Skinners rust technique to age them. I fussy cut out this beautiful image from the pad edging with a Black pen and adding accents of paper from my Gypsy Gypsy Pad along with a little key, finally adding some more Stickles and a little Felt onto my underneath base.


Please do check out all the wonderful papers from Craft Consortium and like their FB page - Craft Consortium Ltd, where you have a chance of winning many fabulous giveaways.


Julie x

Monday, 7 September 2015

My Craft Journey continues with some exciting news.


Hi Everyone, Thanks so much for stopping by today, it means a lot for me to be able to share my exciting news with you.

I was recently contacted 'out of the blue' by a Papercraft company called Craft Consortium who launched on to the UK market in February this year. They make the most exquisite 12x12 paper pads in superb quality in a beautiful selection of 40 double sided papers in each pad, which include pearlescent, foiled, spot varnishing and very elegant finishes. They also stock fantastic Decoupage papers in a superior quality and many match their paper pads, which is a great addition for all of us who like to do Mixed Media.


Anyway I was ecstatic to be asked to design for this company, to showcase their amazing products. My craft projects will also be on display at a prestigious exhibition in Frankfurt called Creative World January 2016 and over the coming months I will be making cards, 3D projects and home decor showcasing how versatile their papers all are.

My card today is made using the Gypsy Gypsy paper pad which has a wonderful mix of eclectic,vintage and shabby chic influences with touches of elegance. Please check out the full paper pad HERE.


The main image was cut out from the pad and tattered at the edges with some lace and a few staples added.


On the Gypsy Gypsy pad I found myself gathering lots of inspiration from the paper designs. This is what influenced me in adding doilies and die cut keys.


My stamps, butterflies and postcards are all fussy cut from the Gypsy Gypsy pad.

For all you Facebook followers please put into FB search engine - Craft Consortium Ltd and Like their page. This way you won't miss out on their regular giveaways.

Thanks again for stopping by, hope you have a wonderful week creating. 

Julie x


LinkWithin

Related Posts Plugin for WordPress, Blogger...
01 09 10